- Administration
- Gestion des utilisateurs
- Migration des champs utilisateurs personnalisés
Migration des champs utilisateurs personnalisés
Learn how to resolve naming conflicts between your existing custom user fields and new system fields via the SafetyCulture web app.Why migrate your custom user fields?
SafetyCulture introduced 12 pre-defined system user fields available in every organization. These include External ID, Employee ID, Start date, Employee type, Job title, Locations, Teams, Cost center, Department, Business unit, External groups, and Entities.
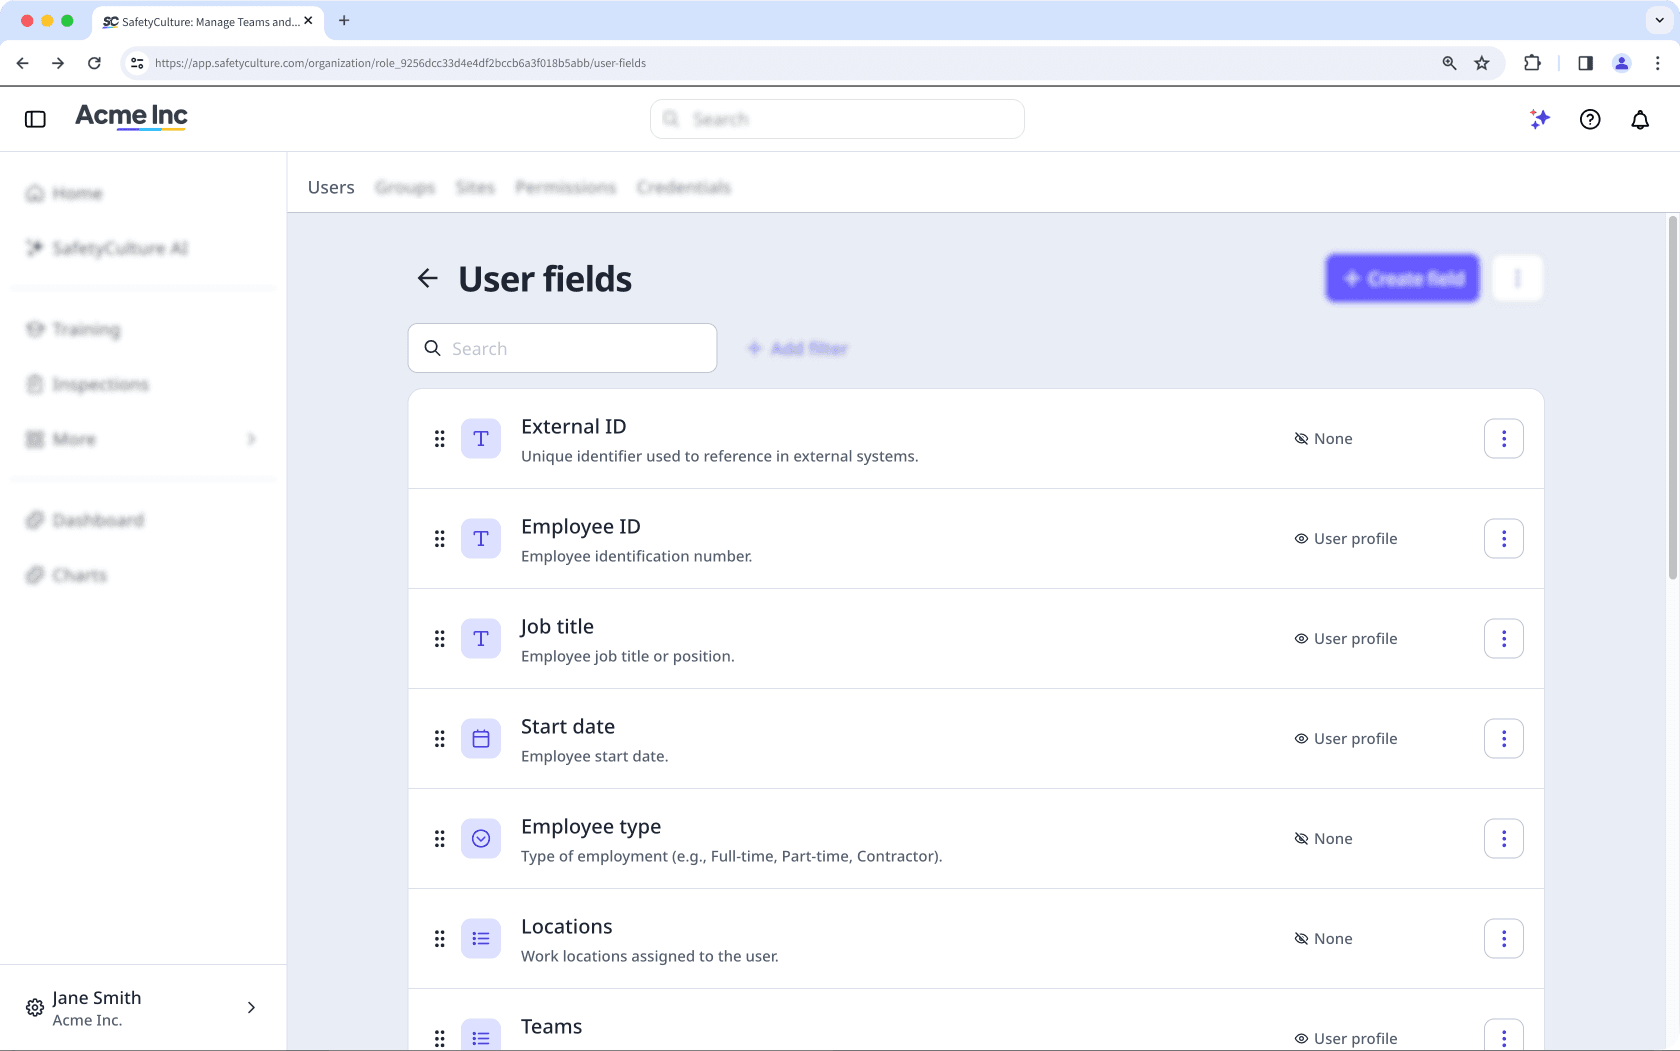
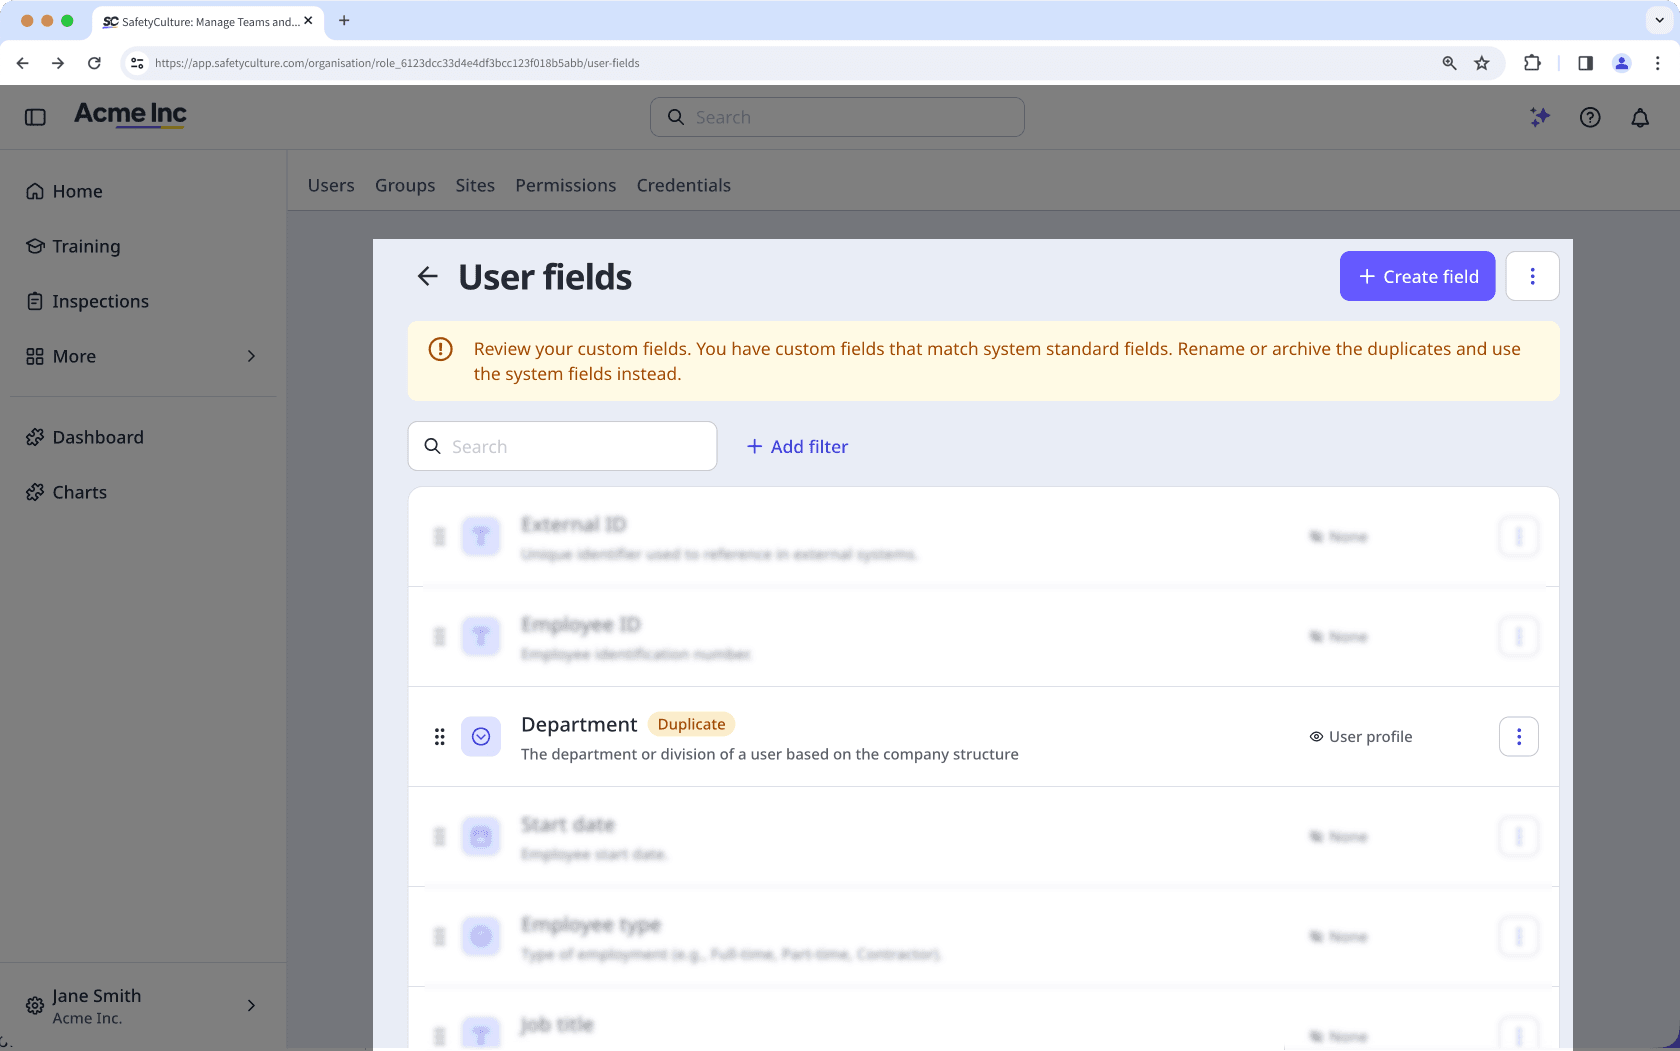
If your organization already had custom user fields with the same names, those fields now conflict. Custom fields cannot share a name with a system field. Until these are resolved, you may encounter errors when adding users in bulk or managing user data.
You have two options to ensure you capture and store your team's information seamlessly:
Rename your existing custom field and archive the unused system field: Choose this option if you would like to continue using your custom field because it has a different data type from your system field. For example, your "Department" custom field is a Text data type, and you prefer a Multi select data type that gives your team options to select when filling out their data. Your existing data is preserved, and no data migration is required.
Migrate to the system field: Choose this option if you want to replace your existing custom field with the equivalent system field going forward. This is beneficial if you want to use the new Multi select data type or use the new native HR integrations. Migration involves reimporting your user data, setting up your dynamic rules, and then archiving your custom fields.
If your integration references user fields by name, such as in a CSV automation, API call, or third-party connector, renaming or archiving a custom field may cause data to stop syncing or populate the wrong field.
After completing either option, check that any hardcoded field names in your integration match the current field name or are updated to reference the correct system field. Contact your integration provider or review your connector configuration if you are unsure how fields are referenced.
Avant de commencer, identifiez les champs personnalisés de votre organisation qui sont en conflit avec un champ système, vérifiez si des règles d'adhésion à des groupes et des sites ont été configurées, et sélectionnez l'option que vous prévoyez de suivre.
Option 1 : renommez votre champ personnalisé existant et archivez le champ système inutilisé
Your organization has an existing custom user field named "Department" with Text data type. The new system field Department is Multi select. You want to keep your custom Text field because your department names are non-standard (for example, "Arizona Ops — Tier 2"). What you can do is to rename the custom field and archive the system field.
Click your organization name on the lower-left corner of the page and select Utilisateurs.
Click
 on the upper-right corner of the page and select
  Gestion des utilisateurs.
Click
on the user field's right-hand side, then select  Modifier.
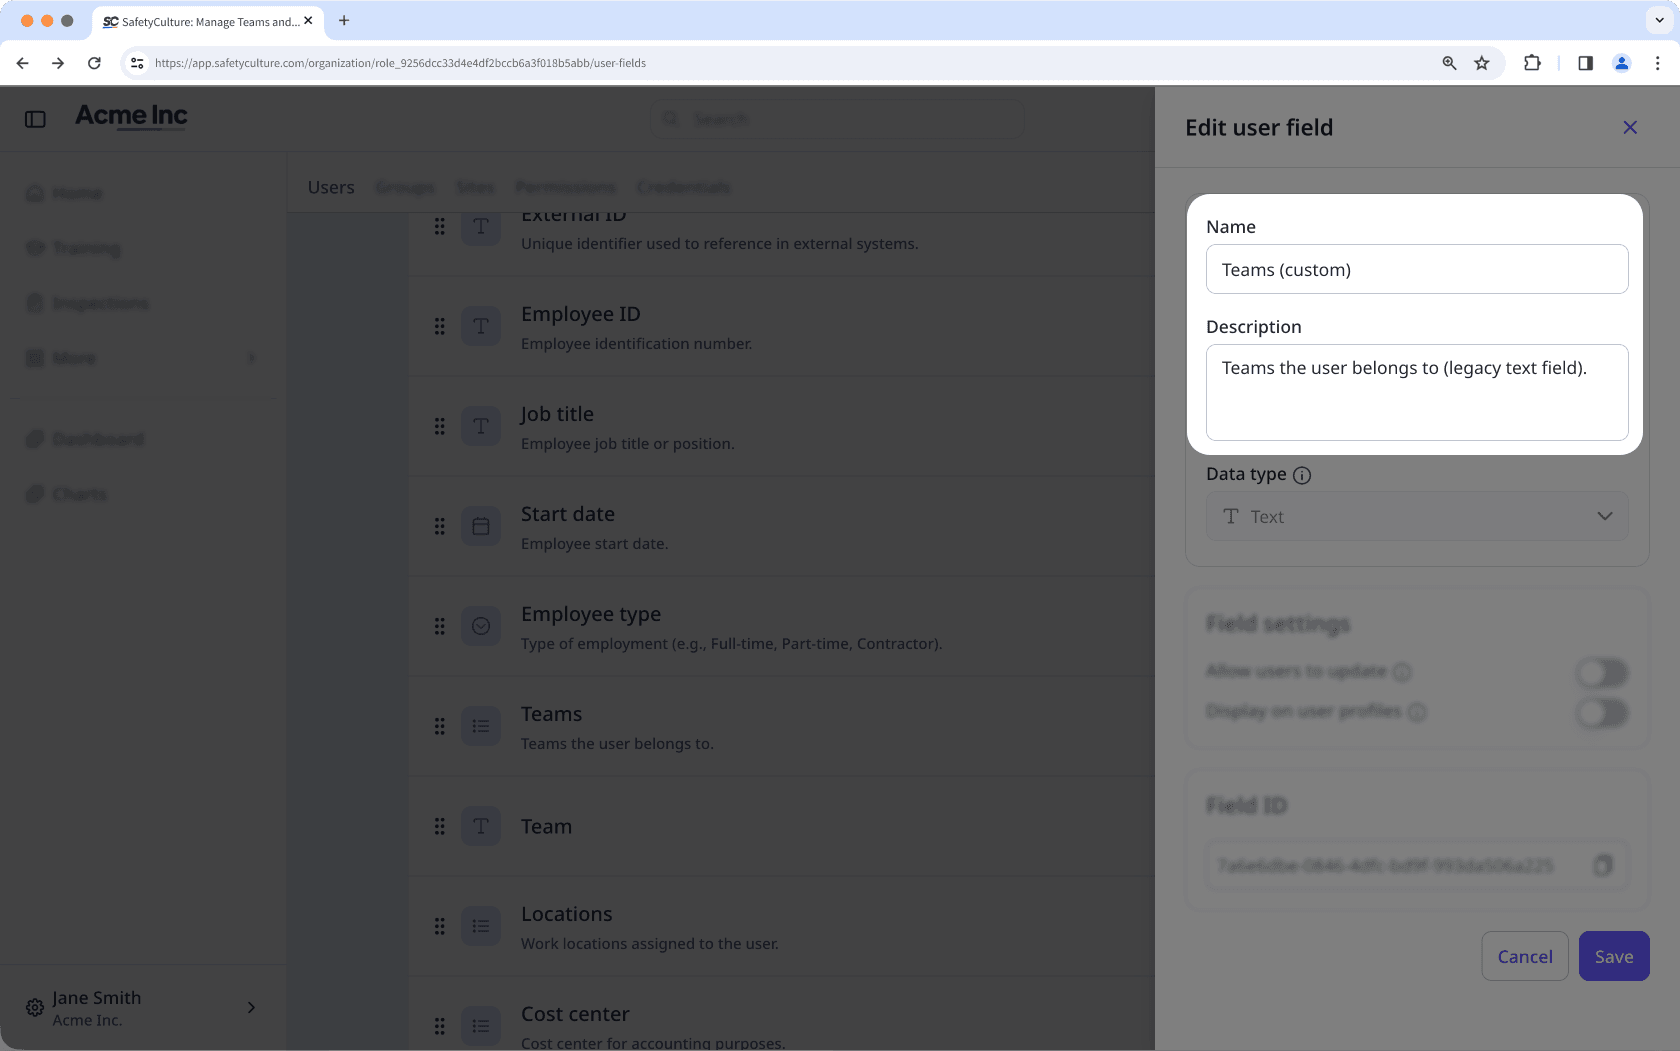
Rename the custom field to differentiate it from the system field. For example, rename "Department" to "Department (custom)".
Click Enregistrer.
Cliquez sur le nom de votre organisation en bas à gauche de la page et sélectionnez Utilisateurs.
Cliquez sur
en haut à droite de la page et sélectionnez Gestion des utilisateurs.Cliquez sur
à droite du champ système que vous souhaitez archiver, puis sélectionnez  Archiver.
Dans la fenêtre contextuelle, cliquez sur Archiver.
Option 2: Migrate to system fields
Your organization has an existing custom field named "Teams" with Text data type. The new system field Teams is Multi select. You want to migrate to the system field to give your team options to select and eventually use a native HR integration as your organization grows.
Cliquez sur le nom de votre organisation en bas à gauche de la page et sélectionnez Utilisateurs.
Cliquez sur
en haut à droite de la page et sélectionnez Gestion des utilisateurs.Cliquez sur
dans la partie droite du champ utilisateur, puis sélectionnez Modifier.Pour différencier le champ personnalisé du champ système, renommez-le. Par exemple, renommez « Équipes » en « Équipes (personnalisé) »。
Cliquez sur Enregistrer.
Cliquez sur le nom de votre organisation en bas à gauche de la page et sélectionnez Utilisateurs.
Cliquez sur
en haut à droite de la page et sélectionnez  Télécharger une liste des utilisateurs (CSV).
Dans la fenêtre contextuelle, sélectionnez le modèle CSV dans lequel vous souhaitez télécharger votre liste d'utilisateurs.
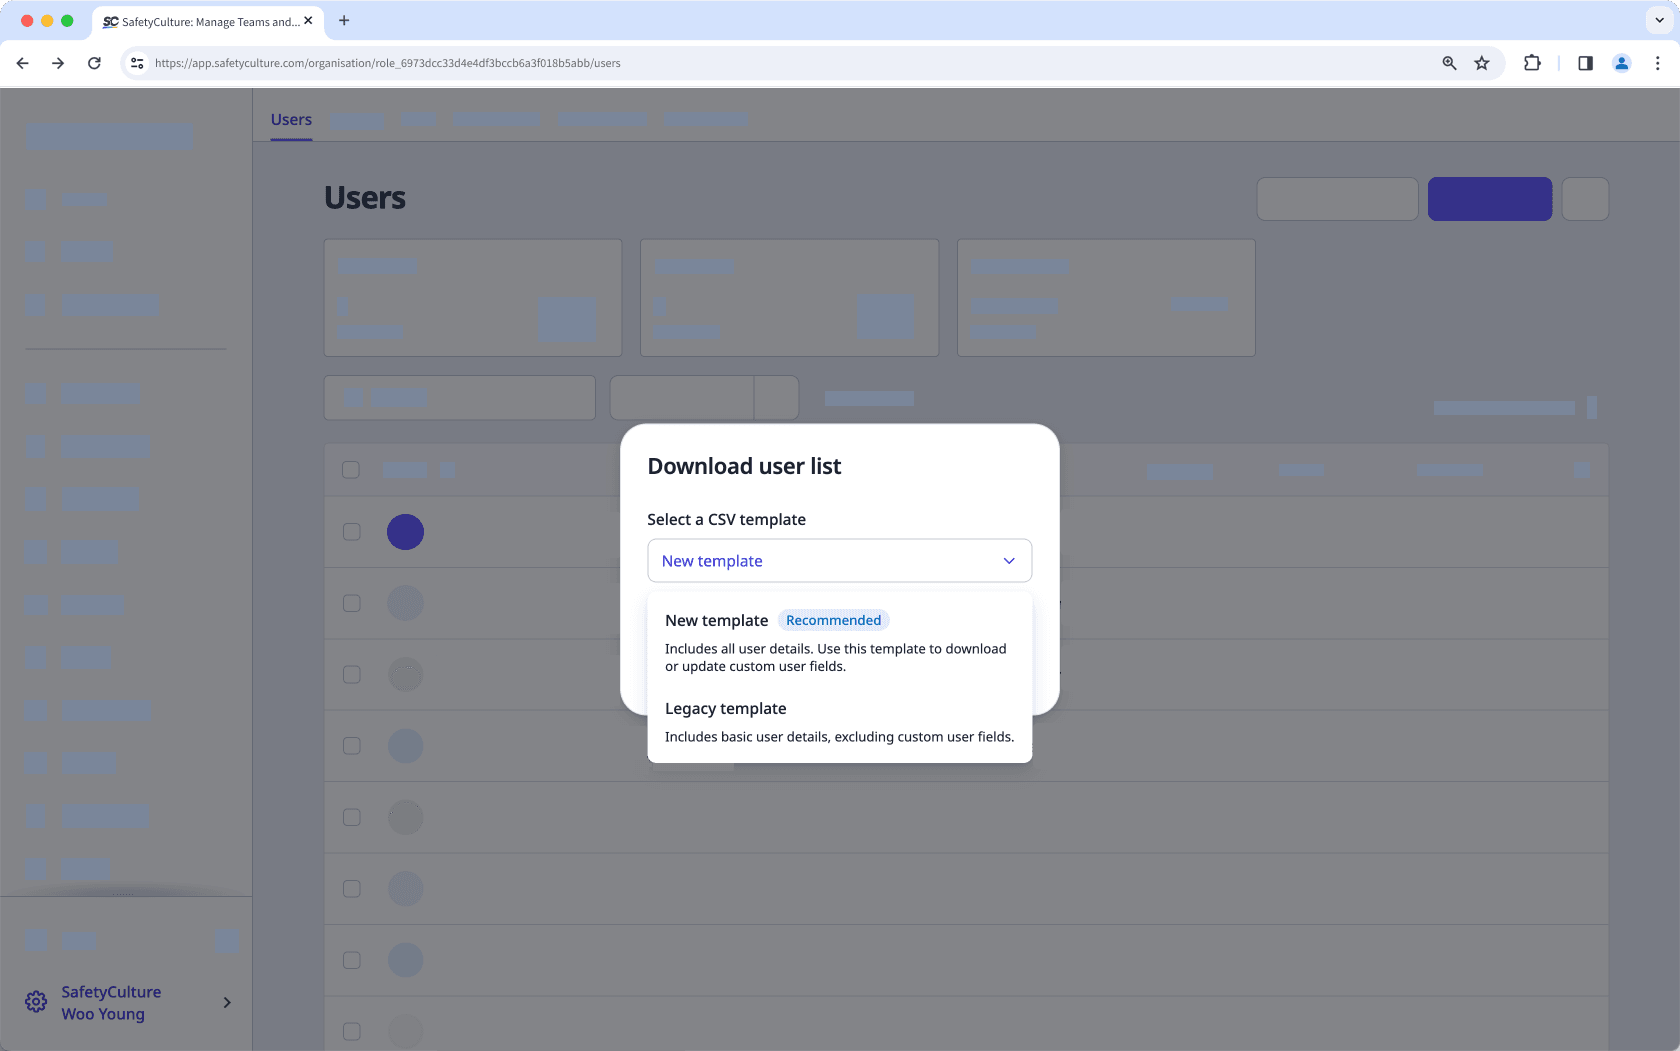
Nouveau modèle : Comprend des champs utilisateurs personnalisés dans l'organisation et est idéal pour la gestion groupée des utilisateurs.
Modèle héritage : Comprend les informations de base sur l'utilisateur, sans les champs utilisateurs personnalisés.
Si des filtres sont appliqués à votre liste d'utilisateurs, cochez « Appliquer les filtres actuels à la liste téléchargée » si vous souhaitez conserver les filtres appliqués à votre fichier CSV.
Cliquer Télécharger.
Ouvrez le fichier CSV que vous avez téléchargé à l'étape 2 et localisez la colonne du champ personnalisé en conflit. Par exemple, « Département ». Cette colonne doit être mise à jour pour être mappée au champ système lors de l'importation.
Met à jour les données de la colonne en fonction du type de données du champ système :
Texte : Saisissez une entrée alphanumérique. Les réponses sont sensibles à la casse.
Date: Saisissez une date.
Utilisateur : Entrez le nom complet ou l'id de l'utilisateur dans votre organisation.
Sélection unique : Saisissez toute option existante créée pour le champ.
Sélection multiple : Saisissez une ou plusieurs options existantes pour le champ, séparées par une virgule.
Si vous migrez vers un champ système à sélection multiple et qu'un utilisateur appartient à plusieurs valeurs, saisissez chaque valeur séparée par une virgule dans la même cellule.
Une fois les données de la colonne prêtes, enregistrez le fichier dans votre référentiel local.
Retourner à la gestion groupée des utilisateurs via l'application Web.
Dans la page « Importer », glissez et déposez votre fichier dans la boîte « Faites glisser votre fichier ici » ou cliquez sur parcourirpour sélectionner le fichier dans le répertoire de votre ordinateur.
Dans la page « Correspondance des colonnes », faites correspondre les en-têtes de colonne de votre CSV avec les champs correspondants dans SafetyCulture. Cliquez ensuite sur
 Suivant.
Dans la page « Examen », consultez les données de votre fichier CSV ou Excel et résolvez les éventuelles erreurs. Vous pouvez également modifier les détails de chaque utilisateur. Une fois que vous êtes prêt, cliquez sur ![]() Revalider.
Revalider.
Pour afficher uniquement les utilisateurs présentant des erreurs, basculez sur l'option « Afficher uniquement les lignes comportant des erreurs ».
Pour afficher tous les nouveaux utilisateurs ajoutés et les utilisateurs existants mis à jour, basculez sur l'option « Afficher uniquement les nouveaux utilisateurs et les utilisateurs mis à jour ».
Pour télécharger tous les utilisateurs ayant des erreurs, cliquez sur
 en haut à droite de la page et sélectionnez XLS (Excel).
Une fois que vous êtes prêt, cliquez sur ![]() Suivant.
Suivant.
Si le champ personnalisé en conflit a été utilisé dans des règles de groupe dynamique ou des règles d'adhésion au site, vous devrez recréer ces règles en utilisant le champ système.
Lors de la recréation des règles, vérifiez l'opérateur utilisé. Si votre champ personnalisé d'origine était de type sélection unique et que le champ système équivalent est de type sélection multiple, vous devez mettre à jour l'opérateur. Par exemple, remplacez est ou n'est pas par contient ou ne contient pas.
Cliquez sur le nom de votre organisation en bas à gauche de la page et sélectionnez Utilisateurs.
Cliquez sur
en haut à droite de la page et sélectionnez Gestion des utilisateurs.Cliquez sur
à droite du champ utilisateur dupliqué que vous souhaitez archiver, puis sélectionnez Archiver.Dans la fenêtre contextuelle, cliquez sur Archiver.
Cette page vous a-t-elle été utile?
Merci pour votre commentaire.