- Integrations
- Power Automate
- Power Automate: Email inspection reports with Outlook
Power Automate: Email inspection reports with Outlook
Learn how to create a Power Automate flow to automatically email inspection reports with Outlook.Third-party products can change over time, so some labels or screen layouts in this article may look different in your environment. If you notice anything out of date, use the feedback form at the bottom of this page to let us know.
This flow utilizes Microsoft Outlook as the client to email inspection reports. This can be interchanged with other connectors, such as Power Automate's Mail connector and Gmail.
Inspection data that gets processed are based on the inspections, which the account that generated the API token has access to. If you're an administrator, you can provide yourself inspection access or assign yourself the "Override permissions: View all data" permission to have visibility over all inspections in your organization.
1. Recurrence
Click Create from the menu on the left-hand side and select Scheduled cloud flow.
In the pop-up window, configure the following fields:
Flow name: Add a name for your flow so you can refer back to it easily.
Starting: Set the date and time you want the flow to start running.
Repeat every: Set the frequency to 1 Hour.
Click Create to create the flow and its first step.
2. Get past time
Click
 below "Recurrence" and select Add an action.
Search and select Get past time under the "Date Time" connector.
Set the "Interval" to 1 and leave the "Time unit" as Hour.
3. Search modified inspections
Click
below "Get past time" and select Add an action.Search and select Search modified inspections under the "SafetyCulture (iAuditor)" connector.
If this is your first time using SafetyCulture on Power Automate, authenticate the connector by configuring the following fields, and then clicking Create New.
Connection Name: We recommend that you name the connection by the account username or email from which the API token is generated.
API token: Enter your API token in the format of "Bearer <token>". Make sure there is a space between "Bearer" and the API token.
In the side panel, click Show all for advanced parameters and then configure the following fields:
Modified After: Click the field, then click
 and select Past time from the list.
Filter by template (optional): If you only want to process inspections from a specific template, click the field to select the template from the dropdown menu, or select Enter custom value and input the template's unique identifier.
Archived (optional): Click the field and select true if you only want to process archived inspections, or select both for active and archived inspections.
Completed (optional): Click the field and select false if you only want to process incomplete inspections, or select both for complete and incomplete inspections.
Ownership (optional): Click the field and select me if you only want to process inspections that are owned by your account, or select other for inspections that are owned by other users in your organization.
Limit: Keep in mind that each flow run can only process up to 1,000 inspections. If your organization conducts more than 1,000 inspections every hour, you should narrow the frequency in "1. Recurrence" and "2. Get past time".
If you encounter any error related to "Data loss Prevention (DLP) policy" when creating the connection to SafetyCulture or any other apps, please contact your IT team to review Microsoft's DLP and unblock the connection.
4. Get a specific inspection
Click
below "Search modified inspections" and select Add an action.Search and select Get a specific inspection under the "SafetyCulture (iAuditor)" connector.
In the side panel, click the "Audit ID" field, then click
and select Inspection Audit ID from the list.This should add the action within a "For each" action.
5. Export an inspection report
Click
below "Get a specific inspection" but within "For each" and select Add an action.Search and select Export an inspection report under the "SafetyCulture (iAuditor)" connector.
In the side panel, click Show all for advanced parameters and configure the following fields:
Audit ID: Click the field, then click
and select Inspection Audit ID from the list.Export Format: Select to export your inspection reports as either PDF or Word files.
Preference ID (optional): Click the field and select the report layout you want to apply. Keep in mind that only report layouts for all templates are available.
6. Delay
Click
below "Export an inspection report" but within "For each" and select Add an action.Search and select Delay under the "Schedule" connector.
In the side panel, set the "Count" to 1 and leave the "Unit" as Minute.
7. Check inspection export status
Click
below "Delay" but within "For each and select Add an action.Search and select Check inspection export status under the "SafetyCulture (iAuditor)" connector.
In the side panel, configure the following fields:
Audit ID: Click the field, then click
and select Inspection Audit ID from the list.Export Task ID: Click the field, then click
and select Export Task ID from the list.
8. HTTP
Click
below "Check inspection export status" but within "For each" and select Add an action.Search and select HTTP under the "HTTP" connector.
In the side panel, configure the following fields:
URI: Click the field, then click
and select Export URL from the list.Method: Click the field and select GET.
9. Send an email (V2)
Click
below "HTTP" but within "For each" and select Add an action.Search and select Send an email (V2) under the "Office 365 Outlook" or "Outlook.com" connector.
If this is your first time using Outlook on Power Automate, authenticate the connector by signing in to your Outlook account.
In the side panel, click Show all for advanced parameters and then configure the following fields:
To: Click the field and specify the email recipients you want to email inspection reports to. Make sure you click "enter/return" on your keyboard for each email you add.
Subject: Click the field and specify the email subject. You can use data from preview items to name emails with inspection elements. For example, "[Template Name]: [Inspection Title] | [Score Percentage]".
Body: Click the field and specify the email body. Similar to the subject field, you can also use data from preview items to include inspection details. Check out the following email body as an example:
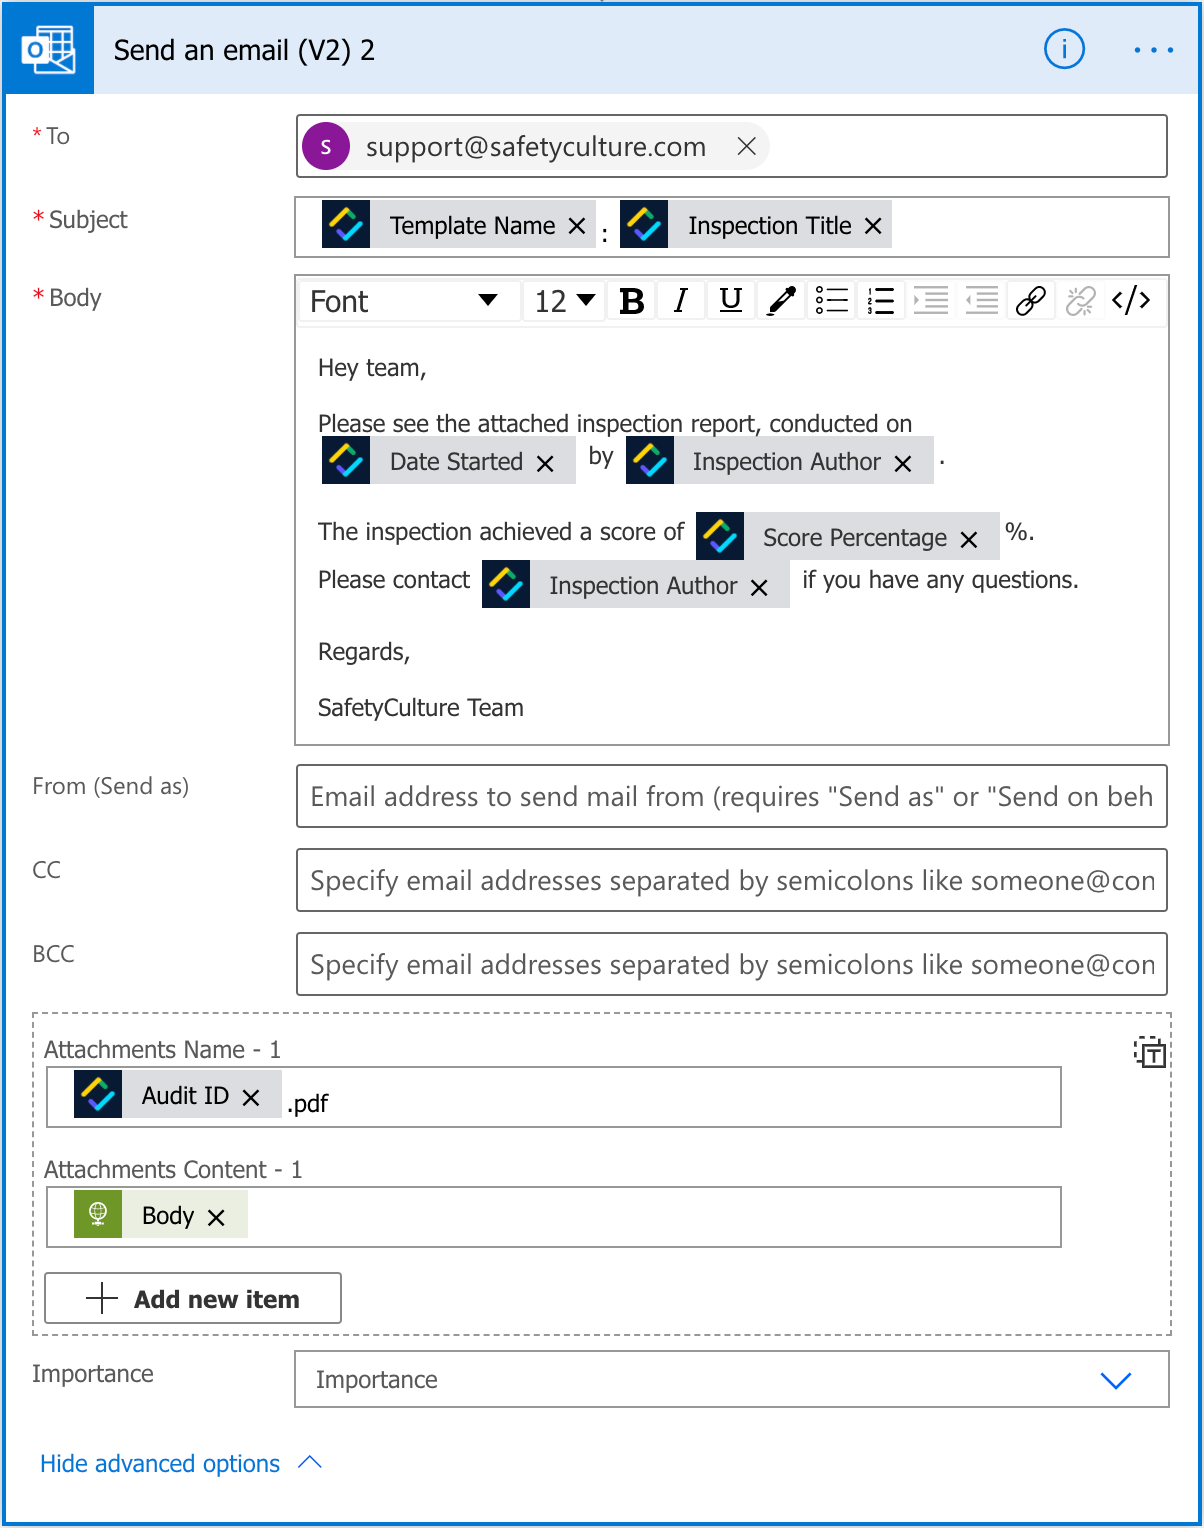
Attachments: Click
 Add new item and configure the following fields:
Name - 1: Click the field, then click
and use items from the list to create a naming convention for inspection reports. Make sure to add ".pdf" or ".docx" at the end, depending on the report format you selected. For example, "<item>.pdf".Content - 1: Click the field, then click
and select Body from the list.
Click Save on the upper-right of the page to save the flow.
Test the flow (optional)
Click Test on the upper-right of the page to begin testing the flow.
Select Manually and click Test.
Click Run flow.
Click Done to monitor the test flow.
If you're on Enterprise Plan, contact your customer success manager for help with SSO, user provisioning, or third-party integrations (Power Automate, Power BI, Zapier). Our customer support team can only provide limited assistance in these areas.
Was this page helpful?
Thank you for letting us know.