- Verwaltung
- Nutzerverwaltung
- Benutzerdefinierte Felder migrieren
Benutzerdefinierte Felder migrieren
Learn how to resolve naming conflicts between your existing custom user fields and new system fields via the SafetyCulture web app.Why migrate your custom user fields?
SafetyCulture introduced 12 pre-defined system user fields available in every organization. These include External ID, Employee ID, Start date, Employee type, Job title, Locations, Teams, Cost center, Department, Business unit, External groups, and Entities.
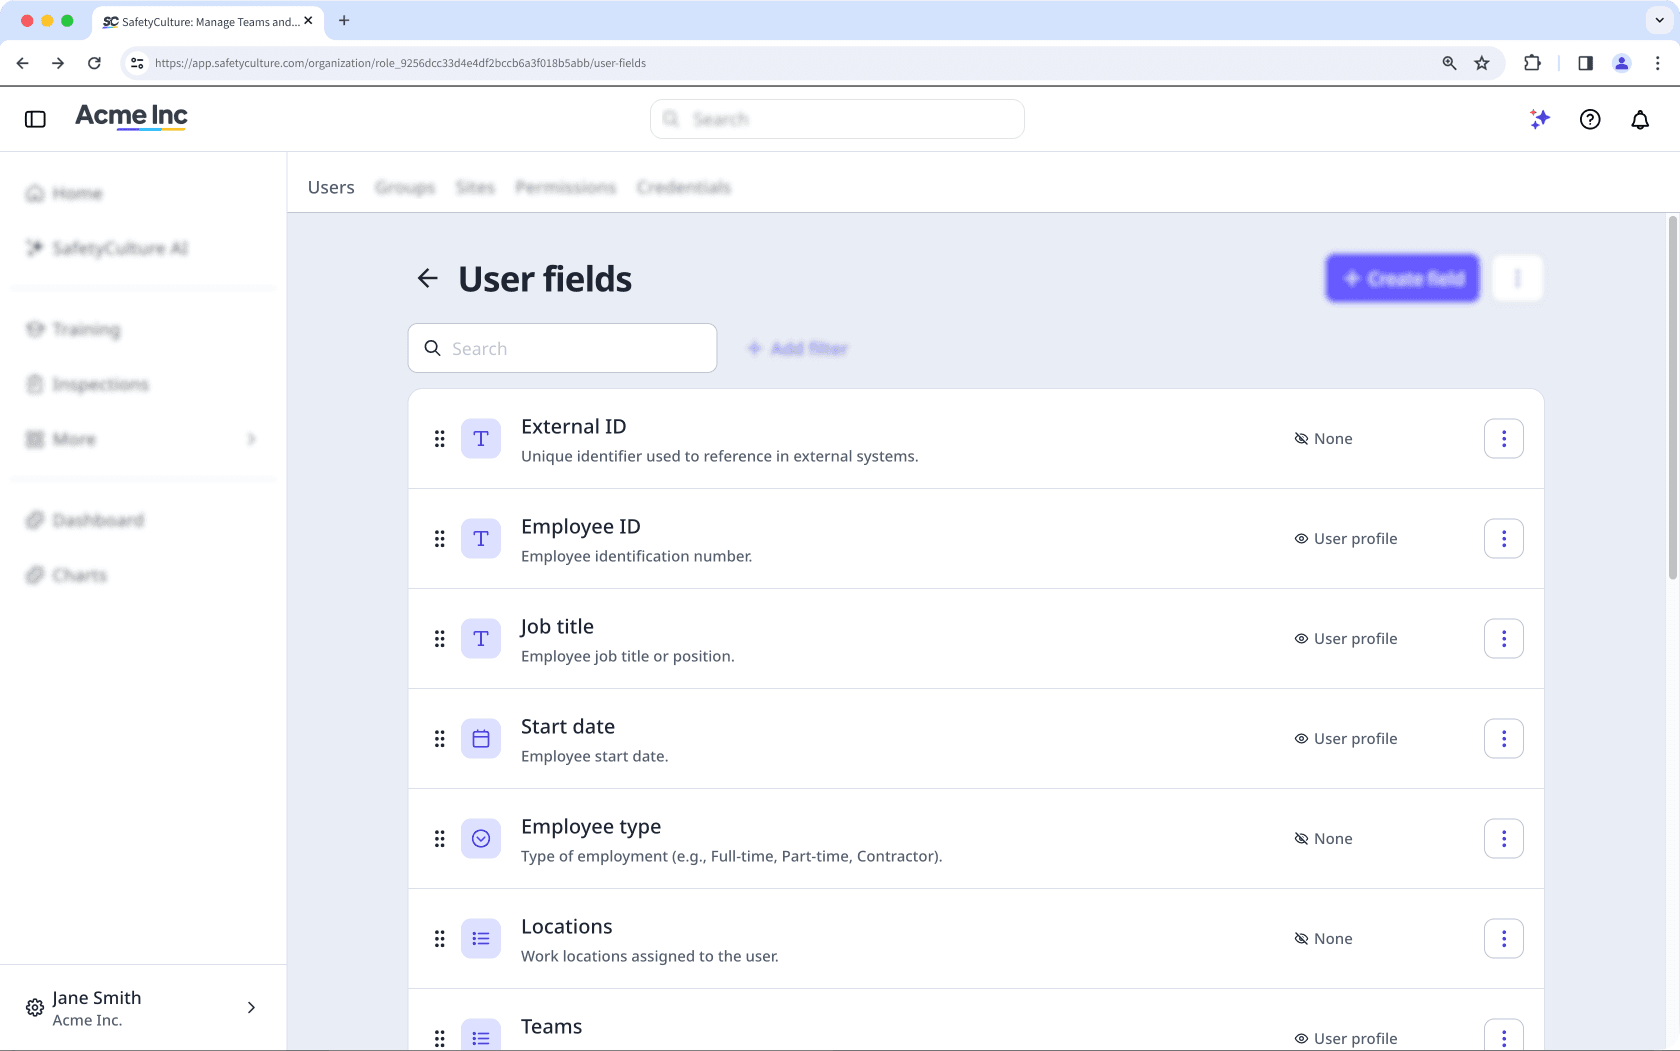
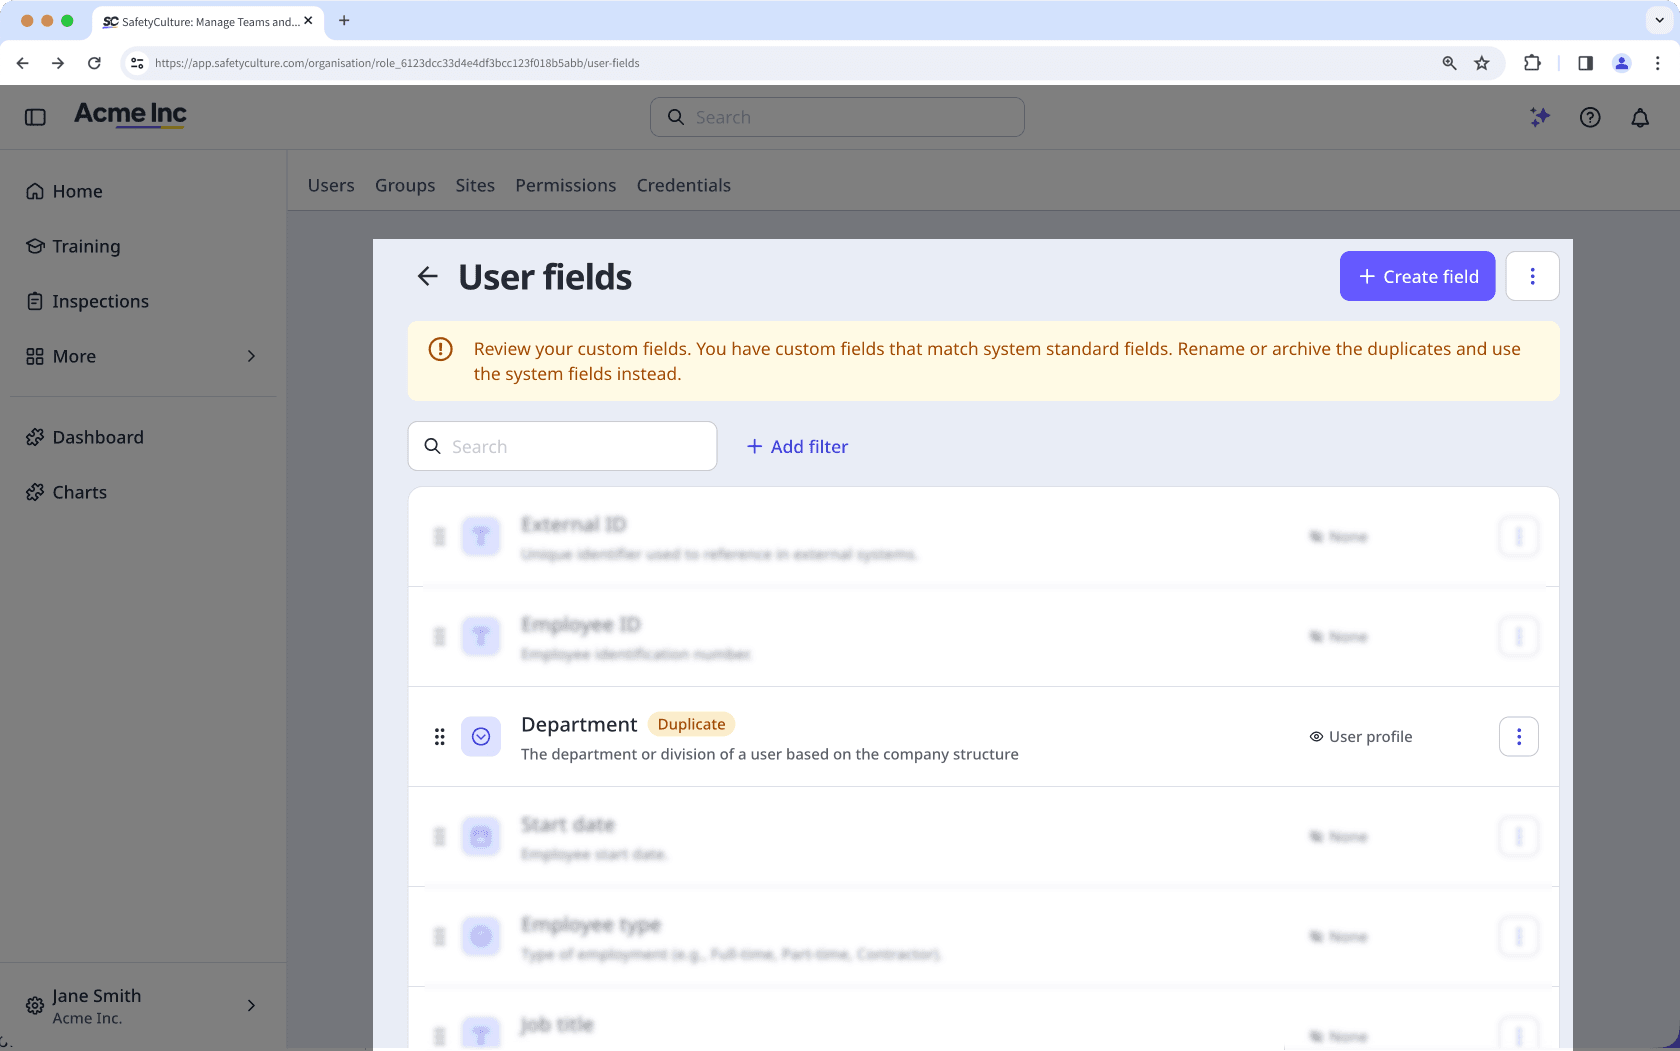
If your organization already had custom user fields with the same names, those fields now conflict. Custom fields cannot share a name with a system field. Until these are resolved, you may encounter errors when adding users in bulk or managing user data.
You have two options to ensure you capture and store your team's information seamlessly:
Rename your existing custom field and archive the unused system field: Choose this option if you would like to continue using your custom field because it has a different data type from your system field. For example, your "Department" custom field is a Text data type, and you prefer a Multi select data type that gives your team options to select when filling out their data. Your existing data is preserved, and no data migration is required.
Migrate to the system field: Choose this option if you want to replace your existing custom field with the equivalent system field going forward. This is beneficial if you want to use the new Multi select data type or use the new native HR integrations. Migration involves reimporting your user data, setting up your dynamic rules, and then archiving your custom fields.
If your integration references user fields by name, such as in a CSV automation, API call, or third-party connector, renaming or archiving a custom field may cause data to stop syncing or populate the wrong field.
After completing either option, check that any hardcoded field names in your integration match the current field name or are updated to reference the correct system field. Contact your integration provider or review your connector configuration if you are unsure how fields are referenced.
Bevor Sie beginnen, stellen Sie fest, welche benutzerdefinierten Felder in Ihrer Organisation mit einem Systemfeld in Konflikt stehen, finden Sie heraus, ob es Regeln für die Gruppen- und Standortmitgliedschaft gibt, und wählen Sie aus, welche Option Sie befolgen möchten.
Option 1: Benennen Sie Ihr vorhandenes benutzerdefiniertes Feld um und archivieren Sie das nicht verwendete Systemfeld
Your organization has an existing custom user field named "Department" with Text data type. The new system field Department is Multi select. You want to keep your custom Text field because your department names are non-standard (for example, "Arizona Ops — Tier 2"). What you can do is to rename the custom field and archive the system field.
Click your organization name on the lower-left corner of the page and select Nutzer.
Click
 on the upper-right corner of the page and select
  Nutzerfelder verwalten.
Click
on the user field's right-hand side, then select  Bearbeiten.
Rename the custom field to differentiate it from the system field. For example, rename "Department" to "Department (custom)".
Click Speichern.
Klicken Sie unten links auf der Seite auf den Namen Ihrer Organisation und wählen Sie Nutzer aus.
Klicken Sie oben rechts auf der Seite auf
und wählen Sie Nutzerfelder verwalten aus.Klicken Sie auf
rechts neben dem Systemfeld, das Sie archivieren möchten, und wählen Sie dann  Archivieren.
Klicken Sie im Pop-up-Fenster auf Archivieren.
Option 2: Migrate to system fields
Your organization has an existing custom field named "Teams" with Text data type. The new system field Teams is Multi select. You want to migrate to the system field to give your team options to select and eventually use a native HR integration as your organization grows.
Klicken Sie unten links auf der Seite auf den Namen Ihrer Organisation und wählen Sie Nutzer aus.
Klicken Sie oben rechts auf der Seite auf
und wählen Sie Nutzerfelder verwalten aus.Klicken Sie auf
auf der rechten Seite des Benutzerfeldes und wählen Sie dann Bearbeiten.Benennen Sie das benutzerdefinierte Feld um, um es vom Systemfeld zu unterscheiden. Benennen Sie zum Beispiel "Teams" in "Teams (benutzerdefiniert)" um.
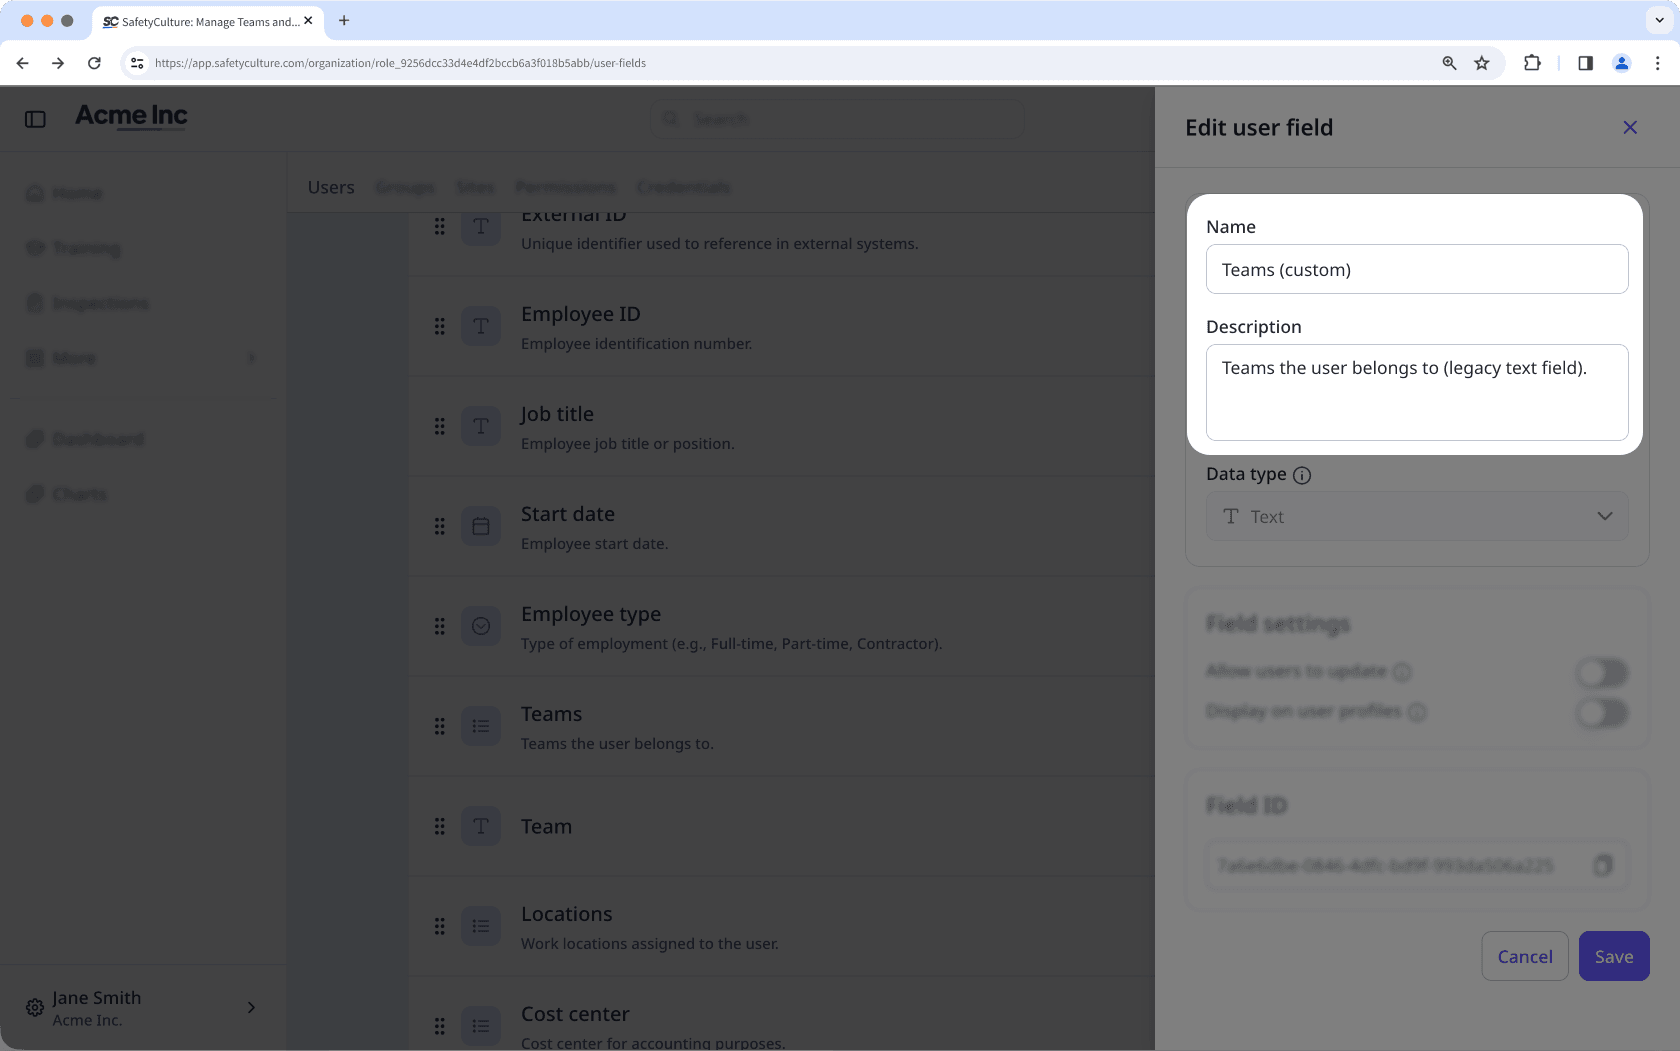
Klicken Sie auf Speichern.
Klicken Sie auf den Namen Ihrer Organisation in der unteren linken Ecke der Seite und wählen Sie Nutzer.
Klicken Sie auf
oben rechts auf der Seite und wählen Sie  Nutzerliste herunterladen (CSV).
Wählen Sie im Pop-up-Fenster die CSV-Vorlage aus, in der Sie Ihre Benutzerliste herunterladen möchten.
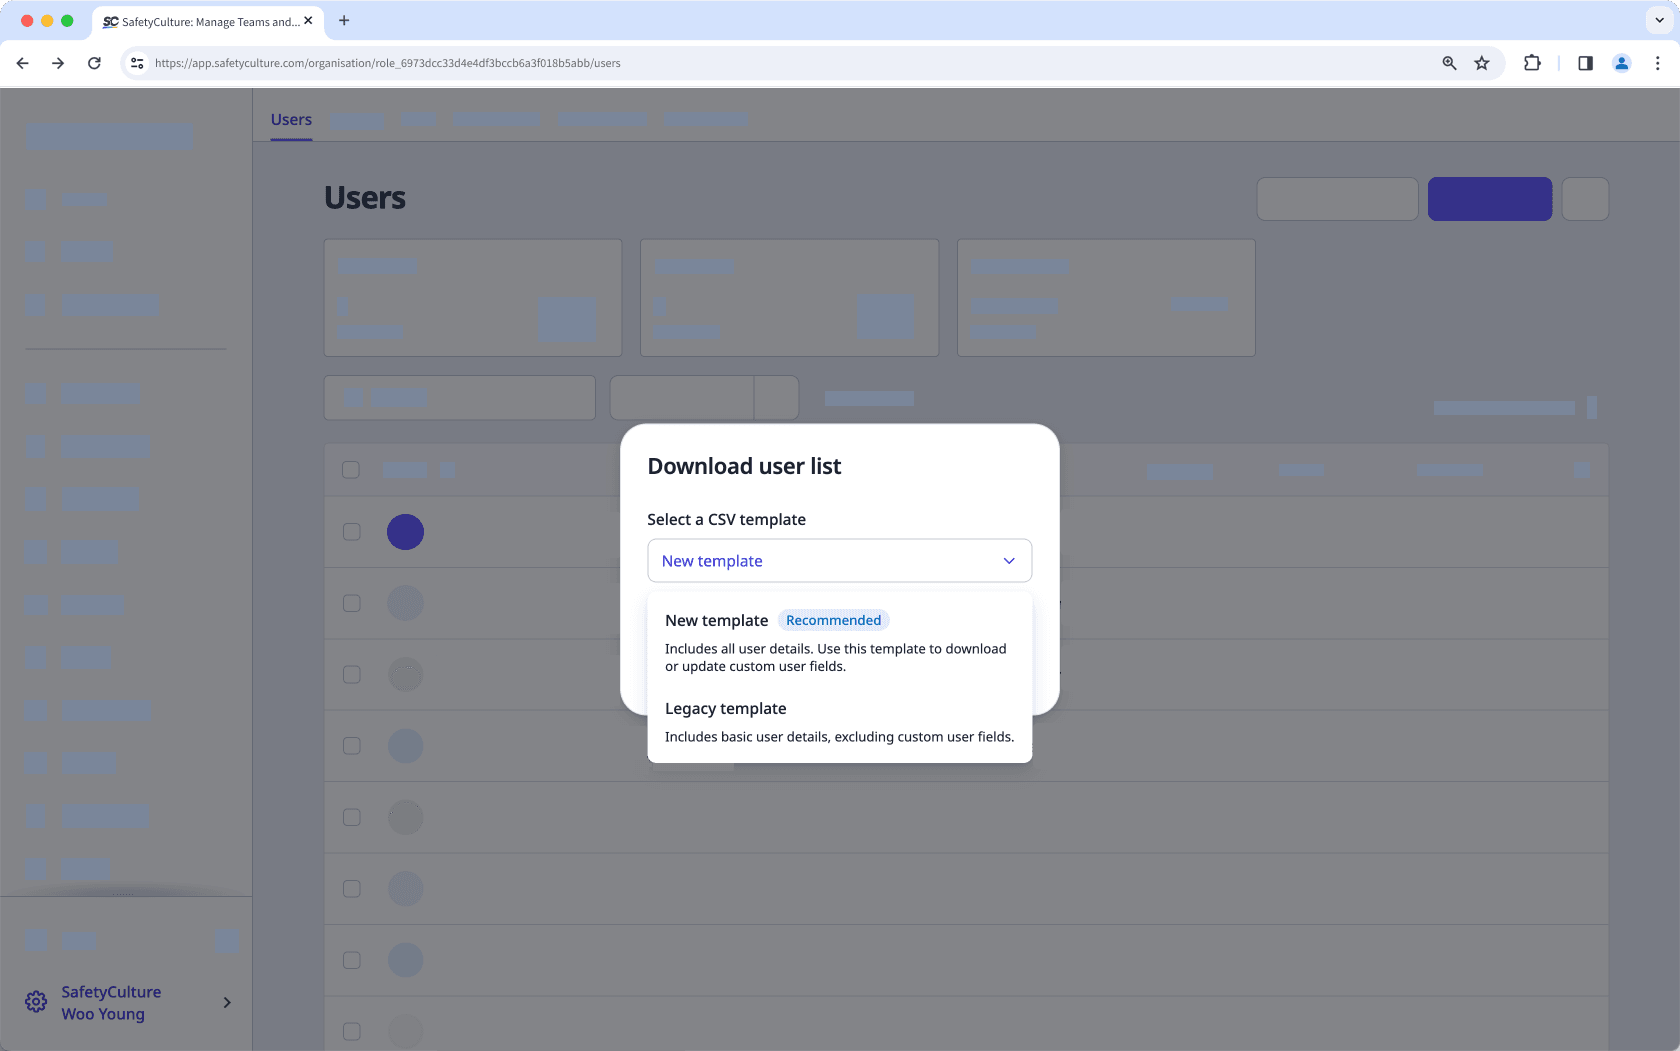
Neue Vorlage: Enthält benutzerdefinierte Benutzerfelder in der Organisation und ist ideal für Massenverwaltung von Benutzern.
Legacy-Vorlage : Enthält grundlegende Benutzerdetails ohne benutzerdefinierte Benutzerfelder.
Wenn Filter auf Ihre Benutzerliste angewendet werden, markieren Sie "Aktuelle Filter auf heruntergeladene Liste anwenden", wenn Sie die auf Ihre CSV-Datei angewendeten Filter beibehalten möchten.
Klicken Sie auf Herunterladen.
Öffnen Sie die CSV-Datei, die Sie in Schritt 2 heruntergeladen haben, und suchen Sie die Spalte für das widersprüchliche benutzerdefinierte Feld. Zum Beispiel: "Abteilung". Diese Spalte muss aktualisiert werden, damit sie beim Hochladen dem Systemfeld zugeordnet werden kann.
Aktualisieren Sie die Spaltendaten auf der Grundlage des Datentyps des Systemfelds:
Text: Geben Sie alphanumerische Zeichen ein. Bei den Antworten wird zwischen Groß- und Kleinschreibung unterschieden.
Datum: Geben Sie ein Datum ein.
Benutzer: Geben Sie den vollständigen Namen oder die Benutzer-ID des Benutzers in Ihrer Organisation ein.
Einfachauswahl:Geben Sie eine beliebige vorhandene Option für das Feld ein.
Mehrfachauswahl:Geben Sie eine oder mehrere vorhandene Optionen für das Feld durch Kommas getrennt ein.
Wenn Sie zu einem Systemfeld mit Mehrfachauswahl migrieren und ein Benutzer zu mehr als einem Wert gehört, geben Sie jeden Wert durch ein Komma getrennt in dieselbe Zelle ein.
Sobald die Spaltendaten fertig sind, speichern Sie die Datei in Ihrem lokalen Repository.
Zurück zur Massenverwaltung von Benutzern über die Web-App.
Ziehen Sie auf der Seite "Hochladen" Ihre Datei in das Feld "Ziehen Sie Ihre Datei hierher" oder klicken Sie auf durchsuchen, um die Datei aus dem Verzeichnis Ihres Computers auszuwählen.
Stimmen Sie auf der Seite "Spalten abgleichen" Ihre CSV- oder Excel-Spaltenüberschriften mit den entsprechenden Feldern in SafetyCulture ab. Klicken Sie dann auf
 Weiter.
Auf der Seite "Überprüfen" können Sie die Daten aus Ihrer CSV-Datei überprüfen und eventuelle Fehler beheben. Sie können auch die Details der einzelnen Benutzer ändern. Sobald Sie fertig sind, klicken Sie auf ![]() Erneut validieren.
Erneut validieren.
Um nur Benutzer mit Fehlern anzuzeigen, aktivieren Sie die Option "Nur Zeilen mit Fehlern anzeigen".
Um alle neu hinzugefügten Benutzer und aktualisierten vorhandenen Benutzer anzuzeigen, aktivieren Sie die Option „Nur neue und aktualisierte Benutzer anzeigen“.
Um alle Nutzer mit Fehlern herunterzuladen, klicken Sie oben rechts auf der Seite auf
 und wählen Sie XLS (Excel) aus.
Sobald Sie fertig sind, klicken Sie auf ![]() Weiter.
Weiter.
Wenn das widersprüchliche benutzerdefinierte Feld in einer dynamischen Gruppe oder beiStandort-Mitgliedschaftsregeln verwendet wurde, müssen Sie diese Regeln unter Verwendung des Systemfelds neu erstellen.
Wenn Sie Regeln neu erstellen, überprüfen Sie den verwendeten Operator. Wenn Ihr ursprüngliches benutzerdefiniertes Feld ein Single-Select-Typ war und das entsprechende Systemfeld ein Multi-Select ist, müssen Sie den Operator aktualisieren. Ersetzen Sie zum Beispiel ist oder ist nicht durch enthält oder enthält nicht.
Klicken Sie unten links auf der Seite auf den Namen Ihrer Organisation und wählen Sie Nutzer aus.
Klicken Sie oben rechts auf der Seite auf
und wählen Sie Nutzerfelder verwalten aus.Klicken Sie auf
rechts neben dem doppelten Benutzerfeld, das Sie archivieren möchten, und wählen Sie dann Archivieren.Klicken Sie im Pop-up-Fenster auf Archivieren.
War diese Seite hilfreich?
Vielen Dank für Ihre Anmerkungen.