- Integrations
- BI tools
- Power BI Desktop: Pull data via the SafetyCulture connector
Power BI Desktop: Pull data via the SafetyCulture connector
Learn how to connect your organization's data to Power BI Desktop.Third-party products can change over time, so some labels or screen layouts in this article may look different in your environment. If you notice anything out of date, use the feedback form at the bottom of this page to let us know.
What is Power BI?
Power BI is one of the leading business intelligence tools that can enhance your data analysis experience. It can process large quantities of data with ease and offers powerful visualization options that can help turn insights into action. This, in combination with the data captured by your SafetyCulture users, can bring success to whichever industry you look after.
Please note that the Power BI connector is unsuitable for very large data sets, and SafetyCulture does not support the use of Power BI gateways.
If you find data loading is taking too long, we recommend using the SafetyCulture Exporter or feed APIs to load your organization's data to a database or data warehouse as the source for Power BI reports.
Power BI data sets
The following data sets are available from the SafetyCulture connector for Power BI:
Templates
Inspections
Inspection items
Sites
Site members (requires the "Platform management: Sites" permission)
Users (requires the "Platform management: Users" permission)
Groups (requires the "Platform management: Groups" permission)
Group users (requires the "Platform management: Groups" permission)
Schedules
Schedule assignees
Schedule occurrences
Actions
Action assignees
Action timeline items
Issues (requires the "Issues: Access" permission)
Issue timeline items (requires the "Issues: Access" permission)
Assets
Training course completion (requires the "Training: Manage content" permission)
The data that gets fetched is based on the data to which the account that generated the API token has access to. If you're an administrator, learn how to assign yourself the "Override permissions: View all data" permission to have visibility over all your organization's templates, inspections, and actions.
Connect to SafetyCulture
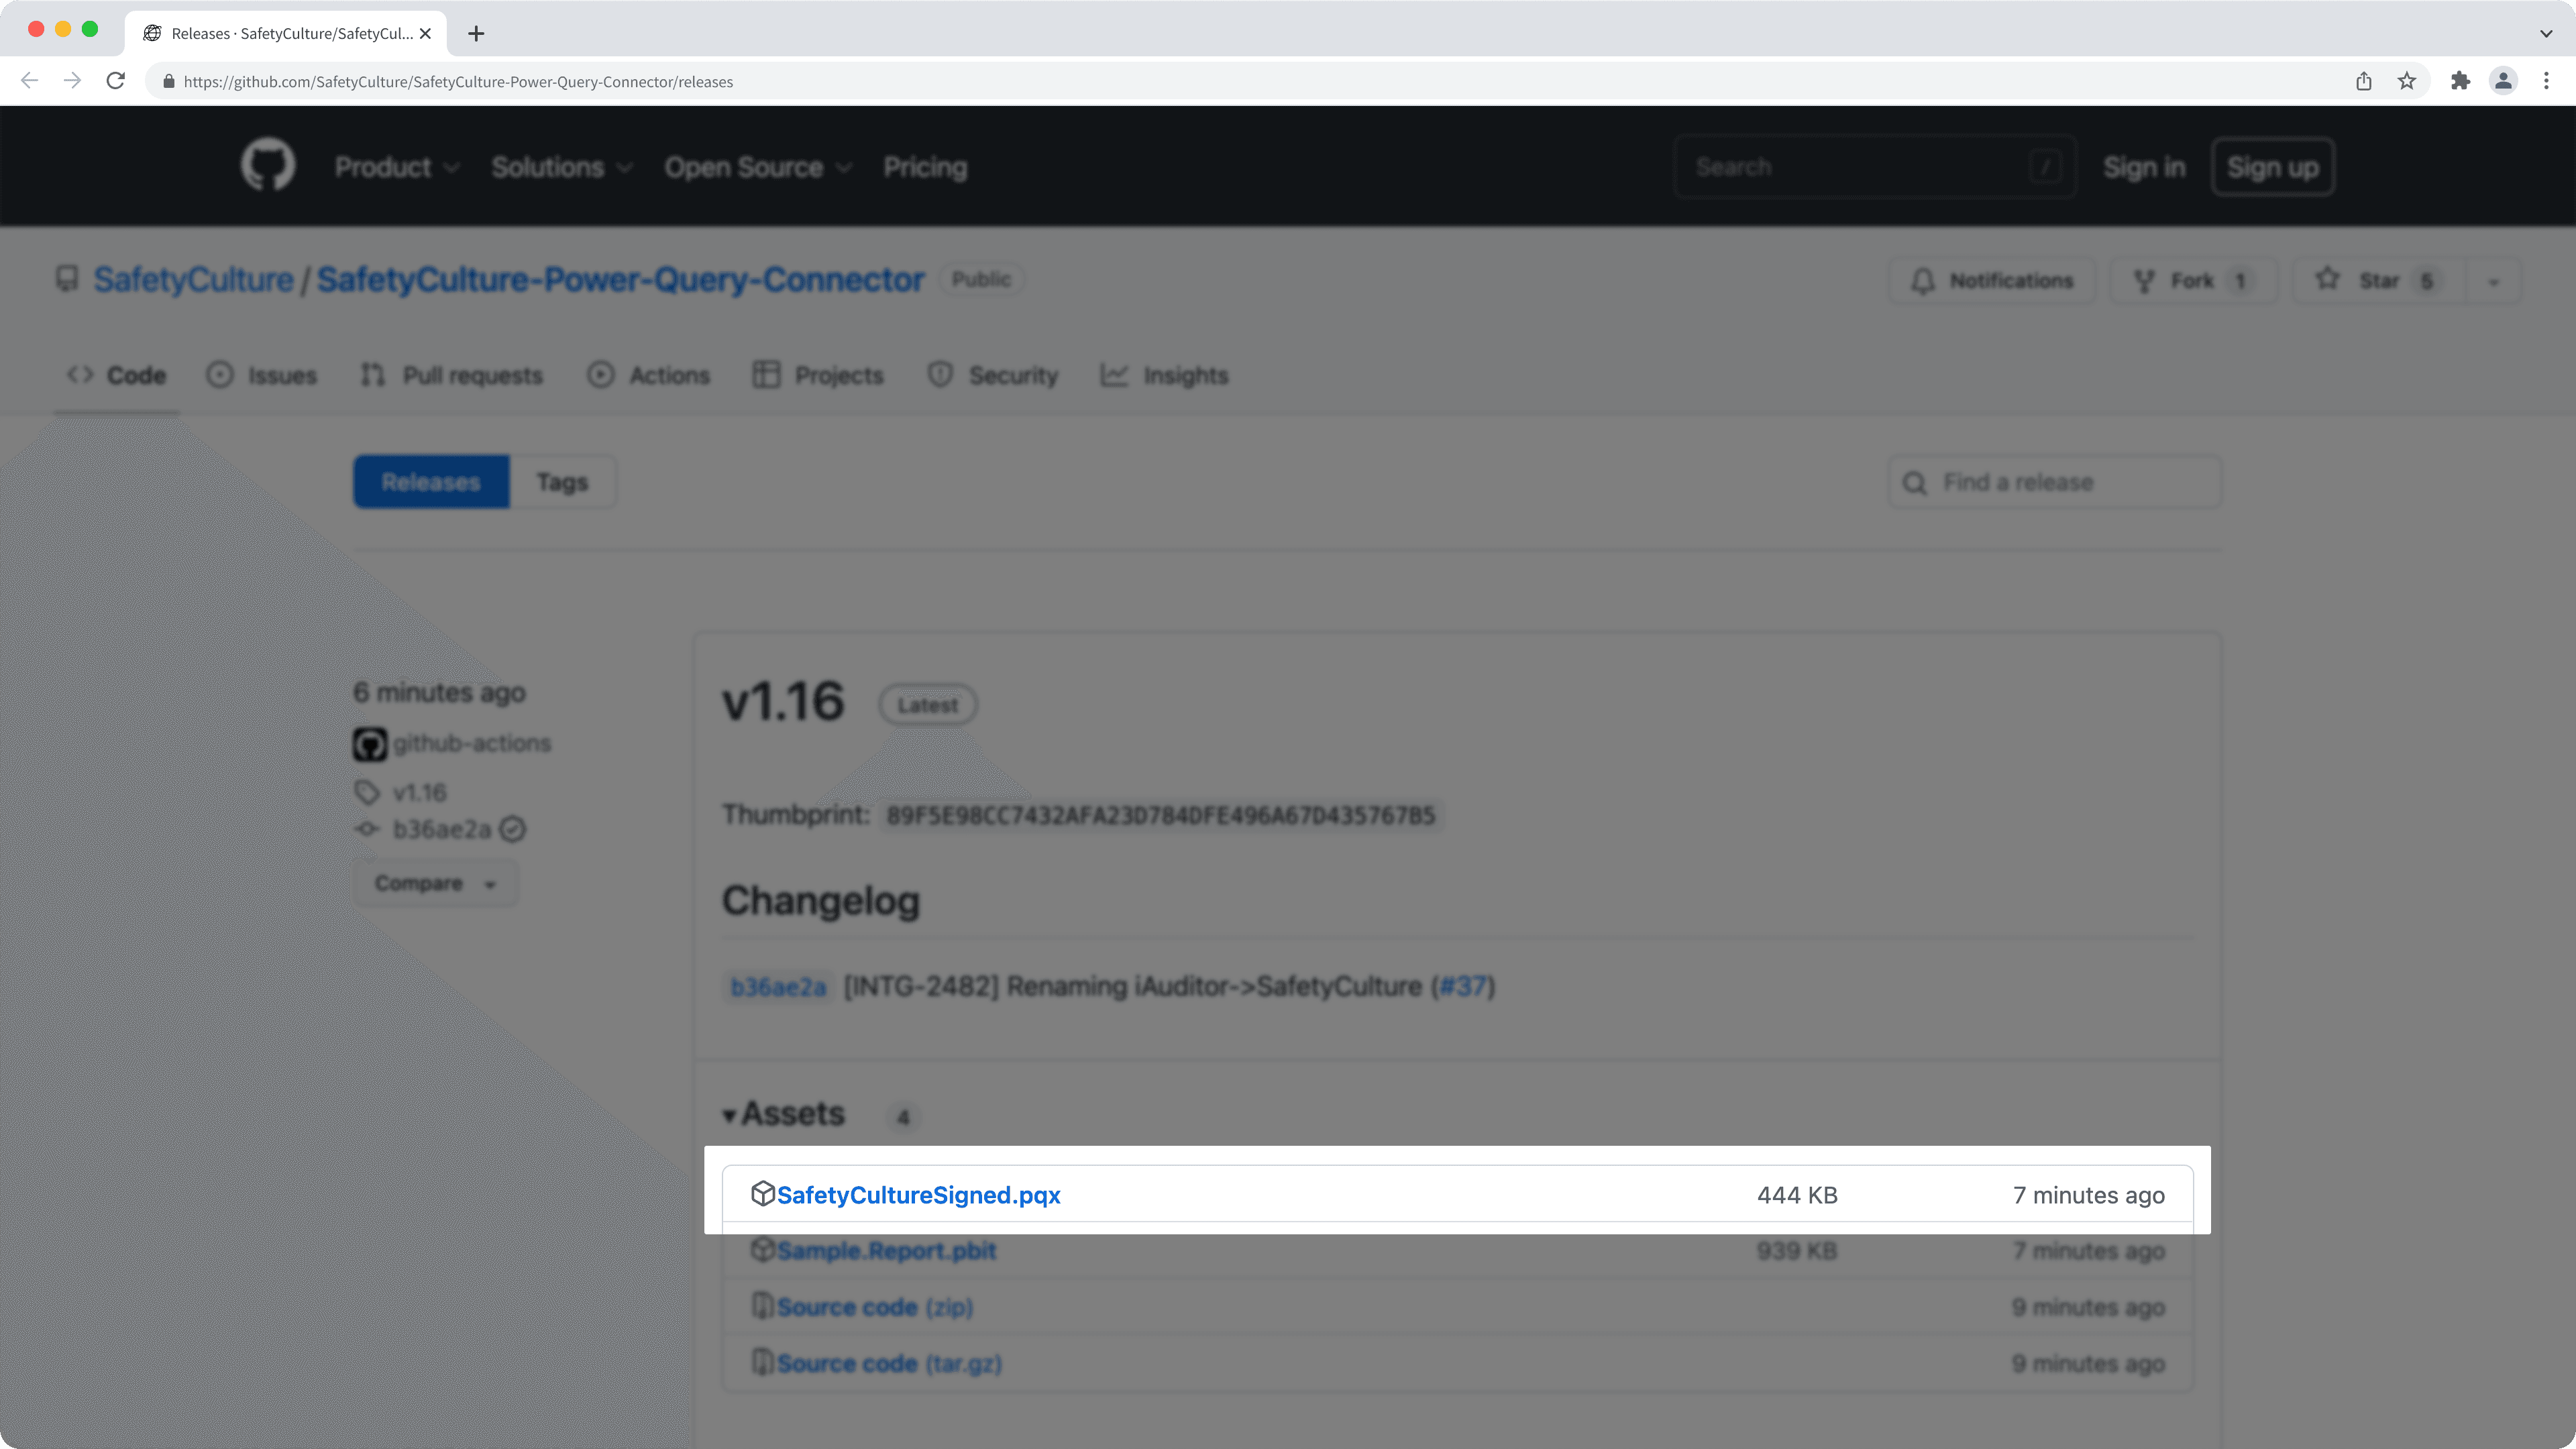
Download the latest version of the "SafetyCultureSigned.pqx" file.

Navigate to the "Power BI Desktop" folder in your "Documents" directory. If the folder doesn't exist, create a new folder and name it "Power BI Desktop".
Navigate to the "Custom Connectors" folder in your "Power BI Desktop" folder. If the folder doesn't exist, create a new folder and name it "Custom Connectors".
Copy and paste the downloaded "SafetyCultureSigned.pqx" file into the "Custom Connectors" folder.
Open Registry Editor on your computer and trust SafetyCulture as a third-party connector. You may require administrator access or contact your administrator to trust the connector. Enter the following value as the "TrustedCertificateThumbprints" when required:
89F5E98CC7432AFA23D784DFE496A67D435767B5Open Power BI Desktop.
Click Get data in the "Home" tab.
In the pop-up window, search and select SafetyCulture.
Click Connect.
Enter your organization's name, then click OK.
Select how you want to authenticate:
Select SafetyCulture API Token in the side panel, then enter your API token. If you're a part of multiple organizations, we recommend that you use this method to authenticate your Power BI connector.
Select Log in to your account in the side panel, then click Sign in and authenticate the connection by logging in to your account.
Click Connect.
In the "Navigator" pop-up window, browse the available data sets in table format and select the tables you want to import.
You can click Load to immediately import the selected tables or click Transform Data to transform and clean the data before importing. Please note that the time required to load the data depends on several factors, including the network speed.
If you're on Enterprise Plan, contact your customer success manager for help with SSO, user provisioning, or third-party integrations (Power Automate, Power BI, Zapier). Our customer support team can only provide limited assistance in these areas.
Frequently asked questions
Yes. We recommend that you watch our releases for the SafetyCulture Power BI connector, as we periodically publish updates to fix bugs or add new features.
You can update your existing connector by replacing the "SafetyCultureSigned.pqx" file in your Power BI's "Custom Connectors" folder with the ".pqx" file from the latest release.
Please note that the iAuditor Power BI connector has been renamed to SafetyCulture Power BI connector from version "1.16.1". If you're updating from version "1.15" or below, please replace your existing "iAuditorSigned.pqx" file in the "Custom Connectors" folder with the new version's "SafetyCultureSigned.pqx" file.
The "parameter expected type Text or Binary" error usually means the API token you've provided for the connector has expired. You can generate a new API token and then follow the instructions below to update your Power BI connector:
Open Power BI Desktop and go to your SafetyCulture dashboard.
In the "Home" tab, click Transform data and select Data source settings.
In the pop-up window, right-click the "SafetyCulture" data source and select Edit Permissions....
In the pop-up window, click Edit... under "Credentials".
Enter your API token in the "Account key" field.
Click Save, then click OK, then click Close.
You can now refresh your dashboard and the error should be fixed.
User API tokens expire after 30 days of inactivity. Expired tokens will stop your integrations from working until you generate a new one.
The "Organization name" helps distinguish between organizations locally. This can be particularly useful if you choose to consume data from multiple SafetyCulture organizations. The "Organization name" information doesn't get transmitted to our servers and is only stored locally on your machine.
You can label the "Organization name" freely, as long as it's unique.
Yes, the "inspections" and "inspection_items" data sets can be filtered using the provided functions of "GetInspections" and "GetInspectionItems", respectively. Both can be found in the nav table.
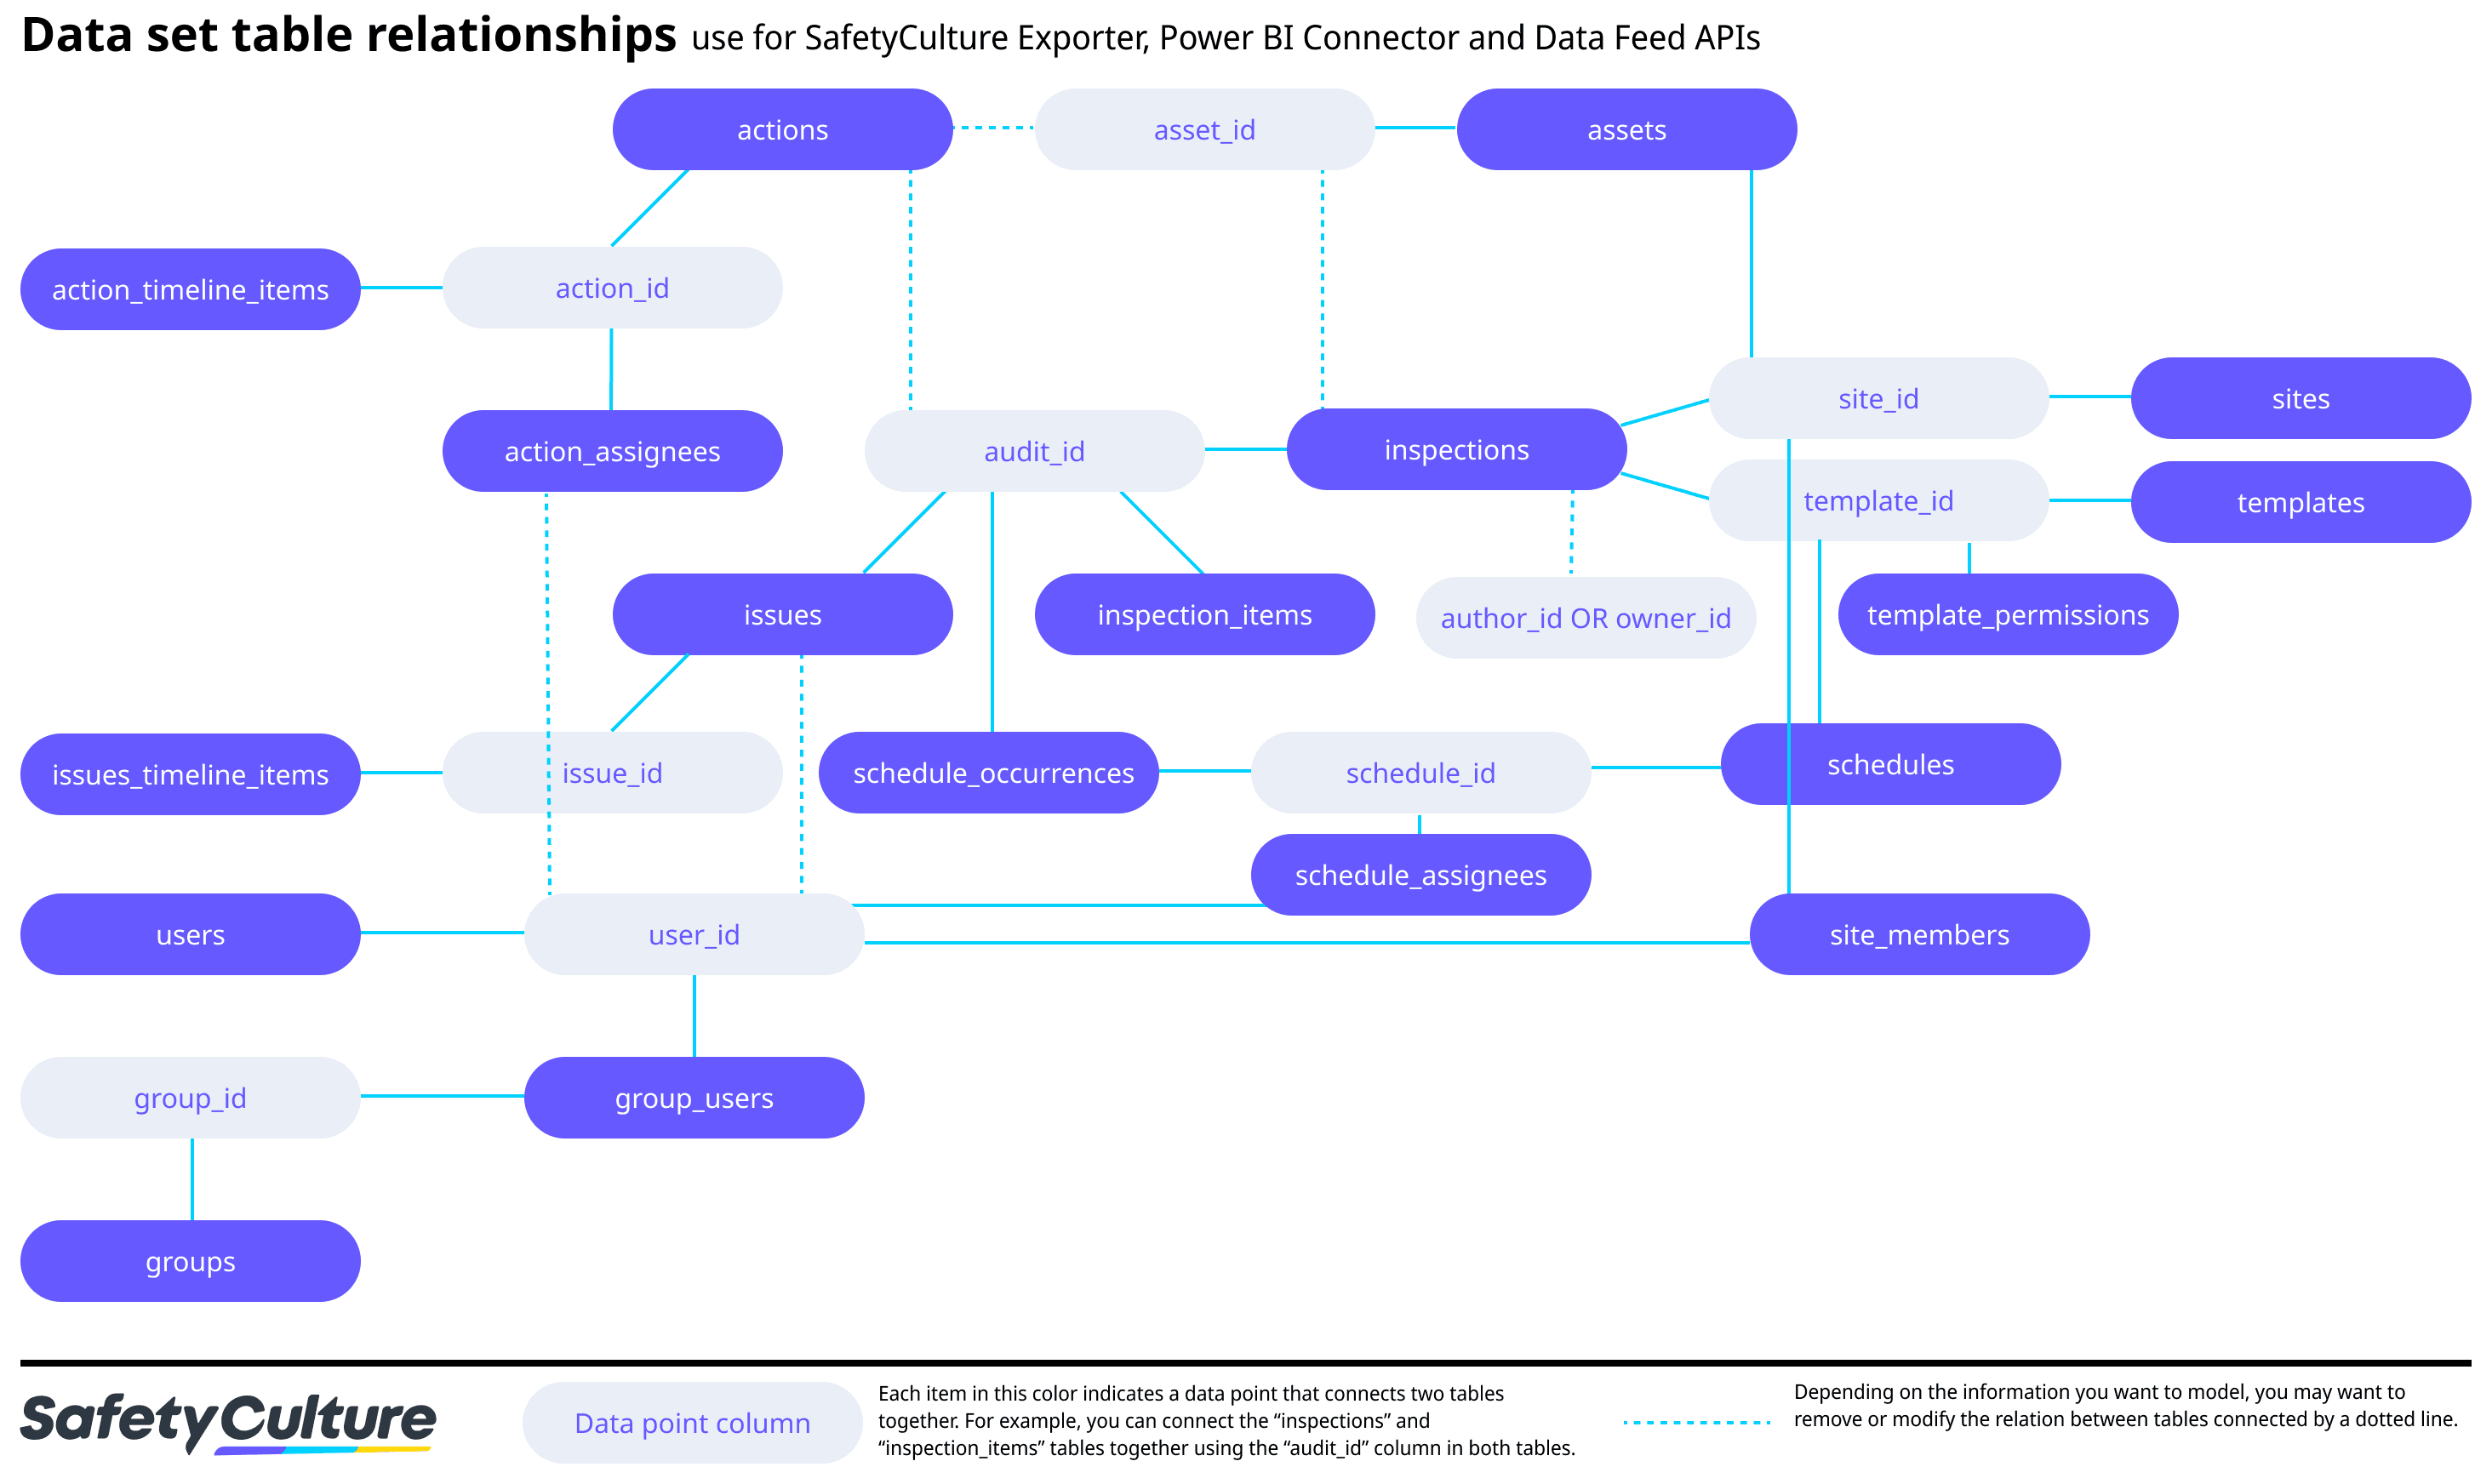
You can refer to the following chart for guidance on modeling your SafetyCulture data sets:

We offer a sample report that you can download to identify common use cases of SafetyCulture data sets.
This can result from the data simply not existing or that you don't have the right permission. For example:
An empty "schedule_assignees" table could mean that the organization doesn't actually have any schedules created. Learn how to create inspection schedules
Empty "groups" and "users" tables could mean that you don't have the "group management" and "user management" permissions in the organization. Learn how to assign and manage permissions.
Was this page helpful?
Thank you for letting us know.