Última actualización:

Turn sensors and gateways on or off

Learn how to efficiently activate your sensors and gateways prior to adding them to SafetyCulture.

¿Qué son los sensores?
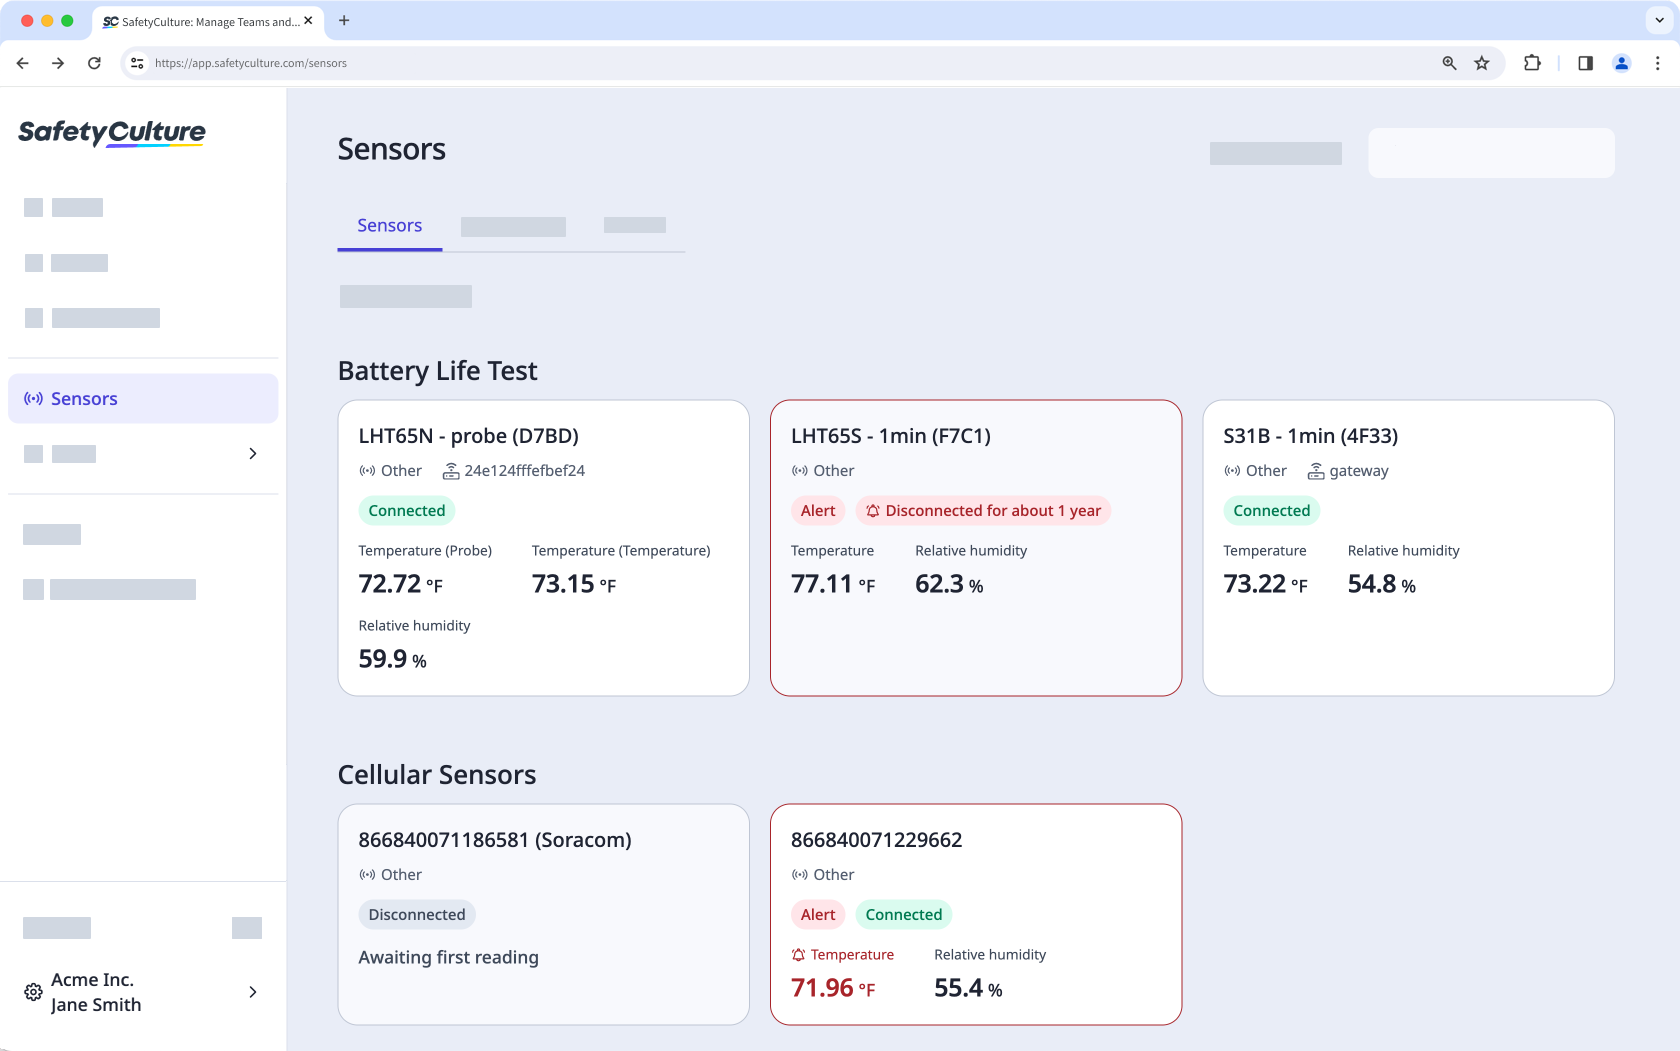
Con sensores en SafetyCulture, puede supervisar sus activos en tiempo real las 24 horas del día, los 7 días de la semana, recibir alertas cuando las cosas se salgan del rango crítico establecido y registrar automáticamente datos críticos para el negocio. Esto le permite cumplir con las normas, evitar la pérdida de activos y tomar decisiones informadas basadas en tendencias históricas de datos de los sensores.

Si ya es un cliente de los sensores y tiene interés en comprar puertas de enlace y sensores adicionales, contacte con su gerente de éxito del cliente dedicado. De lo contrario, póngase en contacto si:

  • Está interesado en comprarnos sensores y puertas de enlace.

  • Está considerando comprar sensores y puertas de enlace de terceros.

  • Quiere saber más sobre nuestras soluciones de sensores.

Página de Sensores en SafetyCulture.

Sensors upload a reading every 10 minutes and you will receive readings until the device is offline. For the sensor to register as offline in the app, the device must be offline for 60 minutes.

Turn sensors on or off

El sensor estándar de temperatura & humedad LHT65N de Dragino.

Turn on

  1. Press and hold the ACT button on the front of the device for at least five seconds. If you're using an older device, the ACT button is at the bottom. You can use a pen or something similar to press the button more firmly.

  2. A green light should flash five times, followed by a red light.

  3. If a gateway is within range, another green light should flash briefly, indicating that a reading is sent and received successfully.

Turn off

  1. Press the ACT button on the front of the device five times in a row. If you're using an older device, the ACT button is at the bottom.

  2. A red light should display briefly, indicating that the device is off.

Reset

  1. Press and hold the ACT button on the front of the device for at least five seconds. If you're using an older device, the ACT button is at the bottom.

  2. A green light should flash five times, followed by a red light.

  3. If a gateway is within range, another green light should flash briefly, indicating that a reading is sent and received successfully.

Send a reading manually

  1. Press and hold the ACT button on the front of the device for three seconds.

  2. A red light should flash, indicating that you sent a reading manually. If you have an external probe attached to your device, a blue light should flash instead. You can send a reading manually for this device once every ten minutes.

Este dispositivo tiene dos variantes. Si utiliza una versión anterior, no hay botón de temperatura del aire (ACT) y necesitará un destornillador Phillips. Por lo tanto, los procesos pueden diferir entre estas versiones.

Nueva versión del dispositivo

El sensor industrial de temperatura & humedad S31B de Dragino.

Encender

  1. Mantenga pulsado el botón de temperatura del aire (ACT) en la parte frontal del dispositivo.

  2. La luz LED parpadea en verde cinco veces, seguido de una luz azul.

  3. Si hay una puerta de enlace dentro del alcance, una luz verde parpadeará brevemente. Esto indica que se envió y recibió una lectura correctamente.

Apagar

  1. Presione el botón de temperatura del aire (ACT) en la parte frontal del dispositivo cinco veces seguidas.

  2. Se enciende brevemente una luz roja que indica que ha apagado el dispositivo correctamente.

Resetear

  1. Mantenga pulsado el botón de temperatura del aire (ACT) en la parte frontal del dispositivo.

  2. La luz LED parpadea en verde cinco veces, seguido de una luz azul.

  3. Si hay una puerta de enlace dentro del alcance, una luz verde parpadeará brevemente. Esto indica que se envió y recibió una lectura correctamente.

Enviar una lectura manualmente

  1. Mantenga presionado el botón de temperatura del aire (ACT) en la parte frontal del dispositivo durante tres segundos.

  2. Una luz azul parpadea, lo que indica que ha enviado una lectura manualmente. Puede enviar una lectura manualmente para este dispositivo una vez cada diez minutos.

Este dispositivo tiene dos variantes. Si utiliza una versión anterior, no hay botón de temperatura del aire (ACT) y necesitará un destornillador Phillips. Por lo tanto, los procesos pueden diferir entre estas versiones.

Encender

  1. Con un destornillador Phillips, quite los cuatro tornillos de la parte frontal del dispositivo.

  2. Quite la tapa.

  3. Elimine el jumper amarillo del pin. The default position of a yellow jumper in a sensor device.

  4. Coloque el jumper amarillo sobre ambos pines de manera vertical. El LED de la placa base debería parpadear en verde. Place the yellow jumper on both pins and the LED should flash green.

  5. Coloque la tapa de nuevo en el dispositivo.

  6. Con un destornillador Phillips, asegure los cuatro tornillos en la parte frontal del dispositivo. Asegúrese de que estén bien apretados y que el dispositivo sea hermético.

Apagar

  1. Con un destornillador Phillips, quite los cuatro tornillos de la parte frontal del dispositivo.

  2. Quite la tapa.

  3. Quite el jumper amarillo de los dos pines. Place the yellow jumper over the two pins vertically.

  4. Coloque el jumper amarillo sobre uno de los pines de manera horizontal. The default position of a yellow jumper in a sensor device.

  5. Coloque la tapa de nuevo en el dispositivo.

  6. Con un destornillador Phillips, asegure los cuatro tornillos en la parte frontal del dispositivo. Asegúrese de que estén bien apretados y que el dispositivo sea hermético.

Resetear

  1. Con un destornillador Phillips, quite los cuatro tornillos de la parte frontal del dispositivo.

  2. Quite la tapa.

  3. Presione el botón de reinicio. El LED de la placa base debería parpadear en verde. Press the reset button on a sensor.

  4. Coloque la tapa de nuevo en el dispositivo.

  5. Con un destornillador Phillips, asegure los cuatro tornillos en la parte frontal del dispositivo. Asegúrese de que estén bien apretados y que el dispositivo sea hermético.

Use the Standard Temperature Sensor (with digital display and probe) to monitor temperature for deployments where a screen is necessary.

Turn on

  1. Connect the probe to the bottom of the device.

  2. Press and hold the power button on the right-hand side of the device for more than three seconds.

  3. Icons are displayed on the screen for three seconds. If you turn the device on before connecting the probe, the screen appears blank until it is connected.

Turn off

  1. Use a Phillips screwdriver to remove the four screws on the back of the device.

  2. Remove the back cover and the batteries.

  3. Re-attach the back cover.

  4. Use a Phillips screwdriver to secure the four screws on the back of the device.

Reset

  1. Use a Phillips screwdriver to remove the four screws on the back of the device. 

  2. Press and hold the reset button for 10 seconds. 

  3. A green light displays.

  4. When the light disappears, continue to hold the reset button for another ten seconds.

  5. The screen turns off.

El sensor de baja temperatura LTC2-LT de Dragino.

Encender

  1. Con un destornillador Phillips, quite los cuatro tornillos de la parte frontal del dispositivo.

  2. Quite la tapa.

  3. Quite el jumper amarillo de la horquilla. [IMAGEN]

  4. Coloque el jumper amarillo sobre ambas horquillas. [IMAGEN]

  5. Coloque la tapa de nuevo en el dispositivo.

  6. Con un destornillador Phillips, afiance los cuatro tornillos de la parte frontal del dispositivo.

Apagar

  1. Con un destornillador Phillips, quite los cuatro tornillos de la parte frontal del dispositivo.

  2. Quite la tapa.

  3. Quite el jumper amarillo de las dos horquillas. [IMAGEN]

  4. Coloque el jumper amarillo sobre una de las horquillas. [IMAGEN]

  5. Coloque la tapa de nuevo en el dispositivo.

  6. Con un destornillador Phillips, afiance los cuatro tornillos de la parte frontal del dispositivo.

Resetear

  1. Con un destornillador Phillips, quite los cuatro tornillos de la parte frontal del dispositivo.

  2. Quite la tapa.

  3. Pulse el botón de reinicio. El LED de la placa del circuito parpadea. [IMAGEN]

  4. Coloque la tapa de nuevo en el dispositivo.

  5. Con un destornillador Phillips, afiance los cuatro tornillos de la parte frontal del dispositivo.

El sensor de alta temperatura LTC2-HT de Dragino.

Encender

  1. Con un destornillador Phillips, quite los cuatro tornillos de la parte frontal del dispositivo.

  2. Quite la tapa.

  3. Quite el jumper amarillo de la horquilla. [IMAGEN]

  4. Coloque el jumper amarillo sobre ambas horquillas. [IMAGEN]

  5. Coloque la tapa de nuevo en el dispositivo.

  6. Con un destornillador Phillips, afiance los cuatro tornillos de la parte frontal del dispositivo.

Apagar

  1. Con un destornillador Phillips, quite los cuatro tornillos de la parte frontal del dispositivo.

  2. Quite la tapa.

  3. Quite el jumper amarillo de las dos horquillas. [IMAGEN]

  4. Coloque el jumper amarillo sobre una de las horquillas. [IMAGEN]

  5. Coloque la tapa de nuevo en el dispositivo.

  6. Con un destornillador Phillips, afiance los cuatro tornillos de la parte frontal del dispositivo.

Resetear

  1. Con un destornillador Phillips, quite los cuatro tornillos de la parte frontal del dispositivo.

  2. Quite la tapa.

  3. Pulse el botón de reinicio. El LED de la placa del circuito parpadea. [IMAGEN]

  4. Coloque la tapa de nuevo en el dispositivo.

  5. Con un destornillador Phillips, afiance los cuatro tornillos de la parte frontal del dispositivo.

El sensor de cierre & apretura LDS02 de Dragino.

Turn on

  1. Slide the battery cover off the back of the device.

  2. Insert two standard AAA batteries. The sensor automatically turns on.

  3. Slide the battery cover back on the device.

Turn off 

  1. Slide the battery cover off the back of the device.

  2. Remove the standard AAA batteries. The sensor automatically turns off.

  3. Slide the battery cover back on the device.

Reset

  1. Slide the battery cover off the back of the device.

  2. Remove the standard AAA batteries. The sensor resets.

  3. Slide the battery cover back on the device.

Use the Industrial Open & Close Sensor to monitor doors and windows in more robust environments.

Turn on

  1. Use a Phillips screwdriver to remove the four screws on the front of the device. 

  2. Remove the lid.

  3. Remove the yellow jumper from the pin. Yellow jumper over one pin in an Industrial Open & Close Sensor.

  4. Place the yellow jumper over both pins vertically. Yellow jumper over both pins vertically in an Industrial Open & Close Sensor.

  5. Place the lid back on the device.

  6. Use a Phillips screwdriver to secure the four screws on the front of the device.

Turn off

  1. Use a Phillips screwdriver to remove the four screws on the front of the device. 

  2. Remove the lid.

  3. Remove the yellow jumper from the two pins. Yellow jumper over both pins vertically in an Industrial Open & Close Sensor.

  4. Place the yellow jumper over one of the pins horizontally. Yellow jumper over one pin in an Industrial Open & Close Sensor.

  5. Place the lid back on the device.

  6. Use a Phillips screwdriver to secure the four screws on the front of the device.

Reset

  1. Use a Phillips screwdriver to remove the four screws on the front of the device. 

  2. Remove the lid.

  3. Press the reset button. A light should flash briefly. Reset an Industrial Open & Close Sensor.

  4. Place the lid back on the device.

  5. Use a Phillips screwdriver to secure the four screws on the front of the device.

El sensor estándar de dióxido de carbono AM103 de Milesight.

Turn on

  1. Remove the cover at the back of the device.

  2. Insert the two batteries included in the package.

  3. Place the cover at the back of the device.

  4. Press and hold the power button on the top of the device for three seconds or longer. The E-ink screen should flash, indicating that the device is on.

Turn off

1. Press and hold the power button on the top of the device for three seconds or longer.

Reset

  1. Press and hold the power button for more than 10 seconds. The device resets to its default factory settings.

El sensor de calidad del aire AM319 de Milesight.

Turn on

  1. Using a Phillips screwdriver, remove the screw from the back cover.

  2. Connect the cable included in the package to the power adapter.

  3. Connect the device to a power source.

  4. Place the cover back on the device.

  5. Using a Phillips screwdriver, secure the screw on the back cover.

  6. Plug in the device.

  7. Press and hold the power button for three seconds or longer. The E-ink screen should flash, indicating that the device is on.

Turn off

1. Press and hold the power button for three seconds or longer.

Reset

  1. Press and hold the power button for more than 10 seconds. The device resets to its default factory settings.

Use the Standard Air Pressure Differential Sensor to monitor positive or negative differential air pressure.

Turn on

  1. Use a Phillips screwdriver to remove the two screws on the front of the device.

  2. Remove the cover.

  3. Insert two x AA batteries.

  4. Move the ON switch to the right. Turn on the Standard Air Pressure Differential Sensor.

  5. The Status will begin to flash red.  The Status in the Standard Air Pressure Differential Sensor.

  6. Place the cover back on the device.

  7. Use a Phillips screwdriver to secure the two screws on the front of the device.

  8. Once the device is connected to a gateway, the Mode should flash green five times. The Mode in a Standard Air Pressure Differential Sensor.

Turn off

  1. Use a Phillips screwdriver to remove the two screws on the front of the device.

  2. Remove the cover.

  3. Move the ON switch to the left. Turn off the Standard Air Pressure Differential Sensor.

  4. Place the cover back on the device.

  5. Use a Phillips screwdriver to secure the two screws on the front of the device.

Reset

  1. Use a Phillips screwdriver to remove the two screws on the front of the device.

  2. Remove the cover.

  3. Move the ON switch to the left. Turn off the Standard Air Pressure Differential Sensor.

  4. Move the ON switch to the right. Turn on the Standard Air Pressure Differential Sensor.

  5. The Status will begin to flash red.  The Status in the Standard Air Pressure Differential Sensor.

  6. Place the cover back on the device.

  7. Use a Phillips screwdriver to secure the two screws on the front of the device.

  8. Once the device is connected to a gateway, the Mode should flash green five times. The Mode in a Standard Air Pressure Differential Sensor.

El sensor WxS 8800-012 de monóxido de carbono (CO) de Polysense.

Turn on

  1. Using a Phillips screwdriver, remove the four screws on the back of the device.

  2. Remove the back panel.

  3. Insert the two batteries included in the package.

  4. Place the cover at the back of the device.

  5. Using a Phillips screwdriver, secure the four screws on the back of the device.

Turn off

  1. Using a Phillips screwdriver, remove the four screws on the back of the device.

  2. Remove the back panel.

  3. Remove the two batteries.

  4. Place the cover at the back of the device.

  5. Using a Phillips screwdriver, secure the four screws on the back of the device.

Reset

  1. Using a Phillips screwdriver, remove the four screws on the back of the device.

  2. Remove the back panel.

  3. Remove the two batteries.

  4. Place the cover at the back of the device.

  5. Using a Phillips screwdriver, secure the four screws on the back of the device.

Use the Electrical Current Sensor to monitor energy consumption minute-by-minute.

We recommend that this sensor is only installed by professionals with knowledge of electrical systems.

Turn on

  1. Clip the sensor around an appropriate wire. This sensor draws its power from an active wire and requires no further action.

Turn off

  1. Unclip the sensor from the installed wire and remove the device. The capacitor of this device will hold power after being disconnected and will drain over time. You do not need to take any further action.

Reset

  1. Unclip the sensor from the installed wired and remove the device.

  2. Clip the sensor around the appropriate wire.

Use the Standard 3-Phase Power Sensor to monitor power usage using three dimensions with revenue grade accuracy.

We recommend that this sensor is only installed by professionals with knowledge of electrical systems.

Turn on

  1. Clip the sensor around an appropriate wire. This sensor draws its power from an active wire and requires no further action.

Turn off

  1. Unclip the sensor from the installed wire and remove the device.

Reset

  1. Unclip the sensor from the installed wired and remove the device.

  2. Clip the sensor around the appropriate wire.

Use the Standard Sound Sensor to monitor sound levels indoors.

Turn on

  1. Press and hold the power button on the back of the device for more than three seconds.

  2. A green light should flash.

Turn off

  1. Press and hold the power button on the back of the device for at least five seconds.

  2. The green light should remain on while you are holding the button.

Reset

  1. Press and hold the power button for 10 to 15 seconds. 

  2. A green light should flash briefly.

Use the Standard Vibration Sensor to monitor sound levels indoors.

Turn on

  1. Press and hold the power button for at least three seconds. You may use a pen or something similar to press the button firmly.

  2. A green light should appear and start to flash as it searches for a gateway. 

  3. The light turns off when it has connected to a gateway successfully.

Turn off

  1. Use a screwdriver to remove the screws on the top of the device.

  2. Remove the battery by carefully sliding it out of the base.

  3. Remove the wire with the white connector.

Reset

  1. Use a screwdriver to remove the screws on the top of the device.

  2. Remove the battery by carefully sliding it out of the base.

  3. Remove and then reattach the wire with the white connector.

  4. Slide the battery back into the base.

  5. Use a screwdriver to fasten the screws on the top of the device.

  6. Press and hold the power button for at least three seconds. You may use a pen or something similar to press the button firmly.

  7. A green light should appear and start to flash as it searches for a gateway. 

  8. The light turns off when it has connected to a gateway successfully.

Use the Signal Capture & IoT Controller to take an analog output and convert this to be visible in SafetyCulture.

Turn on

  1. Connect the sensor to the included power supply.

  2. The System LED should appear static green.

Turn off

  1. Remove the power supply. 

Reset

  1. Remove the power supply. 

  2. Reconnect the sensor to the included power supply.

  3. The System LED should appear static green.

Use the Outdoor GPS Tracker (small) for basic GPS tracking.

Turn on

  1. Use a Phillips screwdriver to remove the screws on the rear cover. 

  2. Insert three AAA batteries.

  3. The LED should flash and connect to a GPS. We recommend for you to be in an area with a good GPS reception, ideally outside if possible.

Turn off

  1. Use a Phillips screwdriver to remove the screws on the rear cover. 

  2. Remove the batteries from the device.

Reset

  1. Use a Phillips screwdriver to remove the screws on the rear cover. 

  2. Remove and then insert the batteries again.

  3. The LED should flash and connect to a GPS. We recommend for you to be in an area with a good GPS reception, ideally outside if possible.

Use the Outdoor GPS Tracker for seamless indoor or outdoor asset management.

Turn on

  1. Use a Phillips screwdriver to remove the screws on the rear cover. 

  2. Insert three AAA batteries.

  3. The LED should flash and connect to a GPS. We recommend for you to be in an area with a good GPS reception, ideally outside if possible.

Turn off

  1. Use a Phillips screwdriver to remove the screws on the rear cover. 

  2. Remove the batteries from the device.

Reset

  1. Use a Phillips screwdriver to remove the screws on the rear cover. 

  2. Remove and then insert the batteries again.

  3. The LED should flash and connect to a GPS. We recommend for you to be in an area with a good GPS reception, ideally outside if possible.

Use the Off-road Vehicle Tracker for fleet management and heavy equipment monitoring in tough environments.

This sensor requires more detailed installation, please contact our Support team.

Use the On-road Fleet & Cold Chain Temperature Tracker to monitor temperature of vehicles or goods alongside driver behavior.

Turn on

  1. Connect the device to an available OBDII socket in your vehicle.

Turn off

  1. Remove the device from the OBDII socket in your vehicle.

Turn gateways on or off

La puerta de enlace Tektelic KONA Micro para el internet de las cosas.

Please note that the LED indicator on the front of the device flashes green periodically and sometimes changes to solid green to indicate that the device is operating normally.

Turn on

  1. Attach the antenna included in the package.

  2. Connect the device to a power source.

  3. Plug in the device.

Turn off

  1. Unplug the device.

  2. Remove the screws from the battery cover on the bottom of the device.

  3. Remove the battery cover.

  4. When you see a cable with a white connector, pull the connector to disconnect the battery backup.

  5. Reconnect the battery backup.

  6. Place the battery cover back on the bottom of the device.

  7. Secure the screws on the battery cover.

Reset

  1. Unplug the device.

  2. Remove the screws from the battery cover on the bottom of the device.

  3. Remove the battery cover.

  4. When you see a cable with a white connector, pull the connector to disconnect the battery backup.

  5. Wait for 20 seconds.

  6. Reconnect the battery backup.

  7. Place the battery cover back on the bottom of the device.

  8. Secure the screws on the battery cover.

  9. Plug in the device.

La puerta de enlace Femto interior con Ethernet y Wi-Fi.

Encender

  1. Coloque la antena incluida en el paquete.

  2. Conecte el dispositivo a una fuente de energía.

  3. Conecte el dispositivo a una toma de Ethernet. También puede consultar la guía para configurar y conectar puertas de enlace a través de Wi-Fi.

  4. Conecte el dispositivo a una fuente de energía.

Apagar

  1. Desconecte el dispositivo de la fuente de energía.

Resetear

  1. Desconecte el dispositivo de la fuente de energía.

  2. Desconecte el puerto de Ethernet si está conectado.

  3. Espere durante varios segundos.

  4. Vuelva a conectar el puerto de Ethernet.

  5. Conecte el dispositivo a una fuente de energía. El indicador de encendido cambia a verde cuando el dispositivo se enciende.

Información adicional

El indicador de encendido cambia a verde cuando se enciende el dispositivo, pero después de unos segundos cambia a rojo y todos los demás indicadores de estado deberían estar verdes. Si el indicador de encendido no muestra este patrón en ningún momento, revise los siguientes pasos de resolución de problemas.

  • Encendido: esta luz debe estar en rojo. Si no lo está, asegúrese de que el cable de alimentación esté conectado correctamente y enchufado a una fuente de energía que funcione. Si el problema persiste, pruebe con otra fuente de energía.

  • LoRa: esta luz debe estar en verde. Si no lo está, asegúrese de que la antena esté colocada correctamente.

  • WAN (símbolo del globo): esta luz debe estar en verde. Si no lo está, asegúrese de que el cable de Ethernet esté conectado correctamente a un puerto con conectividad. Si no lo está, revise [ENLACE].

  • Wi-Fi (símbolo de Wi-Fi): esta luz debe estar en verde. Si no lo está, revise la guía para configurar y conectar puertas de enlace a través de Wi-Fi.

¿Necesita más ayuda?
En este artículo